Sunday, March 18, 2007

First Place for Fabric Portrait!


I was honored (and surprised!) to have won 1st Place in the Table Runner and Wall Hanging division of the judged quilt show at the 2007 Sewing Expo in Oshkosh, WI, March 16-17.

I won a basket chock-full of sewing notions!

As if that wasn't enough, I also won the new Viking Platinum sewing machine that Sew 'N Sew of Appleton donated for the event. They have also offered lessons to help me get acquainted with the new machine. Cool!

It's wonderful to have the validation that all the hours in the sewing room have been time well spent (not only for my mental well-being!)

Thread Calligraphy Class with Nancy K.

At this year's Sewing Expo, I was able to take the all-day hands-on Thread Calligraphy class with Nancy Kazlauckas. I bought her book last year, but never really took the time to sit down and DO it.

Here are some samples from that first day :

This is on fleece. The bright yellow (lower) is rayon embroidery thread. The gold (upper) is the Madeira metallic FS thread.

One thing I discovered was that the Madeira Metallic FS threads are wonderful! As Nancy says, they stitch on "like butter" with excellent coverage for the letters. They also add a classy and elegant sheen that almost looks like little beads are sparkling with the thread. Now I wish I had purchased more than just the one spool! Fortunately, I know where to get more!

This is a remarkably easy technique. And Nancy is a very down-to-earth person who happens to be a good teacher, too! The best part is that you don't need some kind of fancy embroidery machine to do thread calligraphy -- Just a sewing machine that can do a zig-zag stitch and drop feed dogs. Nancy K. recommends a free motion foot. My open-toed stippling foot was not happy about the wide zig-zag , or even a not so wide zig-zag. I had much better results (with my machine and set-up) once I switched to an open-toe zig-zag foot and dropped the presser foot pressure down to 0. I do need to get a closed-toe quilting foot ...

As for prospective projects with this technique, dog tombstones. For about 6 years, I've been meaning to make broken glass mosaic stepping stones for my dad to commemorate all his faithful dogs he's had over the years. I did get so far as to design the tops--I've never gotten around to pouring the QuickCrete cement to finish these projects. I think Nancy's Thread Calligraphy technique will help me to get the job done. Each "block" will contain the dog's name and their years. Becasue it's cloth, I should be able to easily "add on" block through the years as he continues to outlive his faithful companions.

Shiva Paintstiks are from Wisconsin

For over a year, now, I've been very interested in trying Shiva Paintstiks on fabric.

On Saturday, at a session with the Thread Calligraphy Lady, Nancy Katzulaukas, I discovered that Paintsticks are distributed right here in Wisconsin, only about 30 miles away from where I live! All this time, I've been thinking "How exotic, how expensive, how cool ..." I thought I would wait until the Cedar Canyon lady comes to present at Darting Needles Quilt Guild (Appleton) in June on using PaintStiks on fabric.

Well, I couldn't wait. Nancy K. offered a good deal on the PaintSticks with the Shelly Stokes book. So I bought the Irridescent set, along with gold and copper.

Even better : at the session, the local distributors, a Mr. and Mrs. Richeson, from Kimberly, WI, came and gave everyone in attendance the samplar pack of the metallic (gold, silver, and copper) PaintStiks. They seemed very interested to see how quilters and other people are using Shiva Paintstiks, since their original market had been oil painters.

You can buy PaintStiks directly from Richeson's :

Richeson Art

Richeson's Online Catalog entires for Shiva PaintStiks

Or get them from an increasing number of Quilt Shop and textile Artists.

Iris Folding

I recently attended the 6th Annual Sewing Expo at the Fox Valley Technical College here in Oshkosh, WI. One of the classes I attended was a 1-hour session with Fiber Artist Joellyn Quinn on Iris Folding. In less than one hour, attendees created the following 2 samples (Actual size is about 2-1/2 inches square) :


Log Cabin Sample in Fabric


Log Cabin Sample in Paper

It was remarkably fun and fast! And you can see the obvious ties to quilting ... The small size makes it perfect for a greeting cards or scrapbooking. I can see this having potential for postcards, too.

Here are a few more sites on Iris Folding :
Iris Folding Gallery at HGtv

Iris Folding Design Gallery

Tutorial on Iris Folding

Templates for Iris Folding


Tuesday, March 13, 2007

Rail Fence Potholder


Thought I'd share this potholder made from some extra blocks leftover from another project. The green is just in time for St. Patrick's day ...

I made 6 of these to give as hostess gifts when we visit the relatives in France this Spring.

I used regular medium-loft poly batting. I know they always say use the Insul-brite, but I haven't been able to find it locally. I seriously doubt that the Amish ladies who make so many potholders in Lancaster County, PA, bother to use Insul-brite, either.


Sunday, February 25, 2007

Tea Stain Dye Samples


Samples from Marjie McWilliams' online class at Quilt University.

The variety is amazing!
Rows 1+2, 3+4 are the same teas.
Rows 1+3 use an Alum Mordant.
Rows 2+4 use a Vinegar mordant.

Teas Used : Twinings Earl Gray, Bigelow English Breakfast, Folgers Instant Coffee, Celestial Seasonings Cranberry-Apple Zinger, Bigelow Fruit & Almond, Celestial Seasonings Wild Berry Zinger, Belfast Bay Rooibos Chai, Stash Peppermint.

One sample stayed in the tea cup for 15 minutes.
The 2nd sample stayed in the tea cup for 1 hour for a deeper, richer color.

Of note : The Alum Mordant turned fruity pink tea stains into a blue or sagey green color. It also turned peppermint into a nice yellow.

Last summer, I tried Tea Stain dying to get skin tones for fabric portraits. But most of the color washed out with the rinse water. Marjie's method seems to work much better! I think the secret is that we don't mordant or rinse until the stain has set (ie, dried and heat set).

Saturday, February 10, 2007

Needle Lace Tree, Leaf & Moss

These are examples of Needle Lace.

I learned this technique from Susan Brittingham at Quilt University (online).

Use a heavy water-soluble stabilizer in a spring-tension embroidery hoop (These are thinner than the old wooden ones, and will fit under the foot of your machine.) along with some tulle or netting. Then you sew-sew-sew ... After the stabilizer is washed away, the netting gives the piece some body and structure which may be needed for larger pieces like the leaf and the tree canopy. The moss seems to get thick enough that it manages to support itself after the stabilizer washes away.

When your free-standing embroidery is complete, it can be appliqued to a quilt or wall-hanging.


The background fabric is a hand-dyed scrunch & dump that I did in one of Marjie McWilliams dying classes also at Quilt University.

Monday, January 01, 2007

Viking-Husqvarna Rose

Someone asked me what kind of sewing machine I have : Viking Husqvarna Rose.

This is a very nice machine that has served me well. But let me say that what I do does NOT require any special or expensive sewing machine. Most machines can be set up to do free-motion quilting and embroidery. Figure out how to drop your feed-dogs and get a spring-loaded foot, and you can do what I do!

All the projects below were done on my Viking Rose. The one exception is the bear at the very bottom, who was done on a Rikar (very sturdy, solid work-horse of a sewing machine).

I have recently acquired a few new gadgets :
Fabric Mover with Stitch Regulator
Viking Husqvarna Designer 1 (a hand-me-down from my Mom, who upgraded to a newer machine). I haven't taken it out of the box yet ...

Oliver is complete!


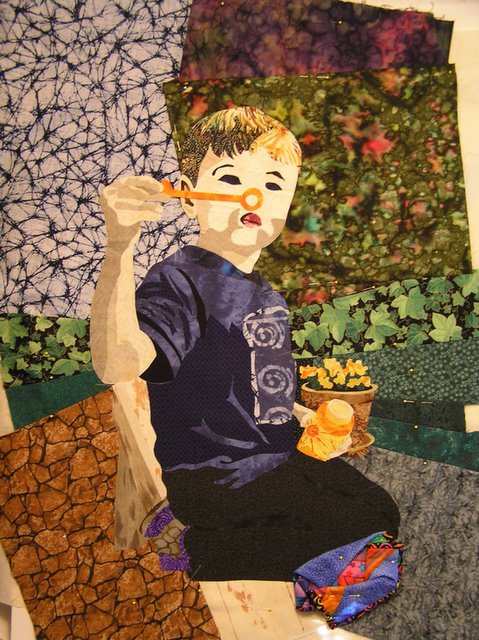
Here's the final Oliver portrait quilt.

You'll notice that it is not properly squared up. This was an intentional choice. I wanted to keep the sky "bigger" and not cut off the bubble on the right. These choices were also somewhat dictated by how much material I had for some of the background pieces--I just didn't have any more for some of these fabrics.

The "Little Blankie" at his knees was made of scraps from another blanket I had made for Oliver.

The Bubble Bottle - Detail :

The beads on the bottle are sewn on by hand (that only took 4 hours! I'm not a beader ...) The beads in the flowers are the iron-on Hot-Fix Swarofski (sp?) crystals. You can also see some of the thread-painting in the folds of his shirt here.

When I did cut this piece down to the trim size, my family and I experienced an unexpected grief. He's been on my design wall and growing for the past 2 years. It's a bit sad to see him get smaller. Sigh!

Tuesday, December 05, 2006

Oliver - Almost done!

Here's the full view. I finished the background quilting. I still need to cut it down to size and add a binding.

I also plan to add some beads to the sunburst on the bubble bottle.

If you liked the 1st face, it's underneath this one.

It's only taken 2-1/2 years to get this far!
This has certainly been my biggest challenge so far! Posted by Picasa

Oliver - 2nd Face Detail with Threadpainting

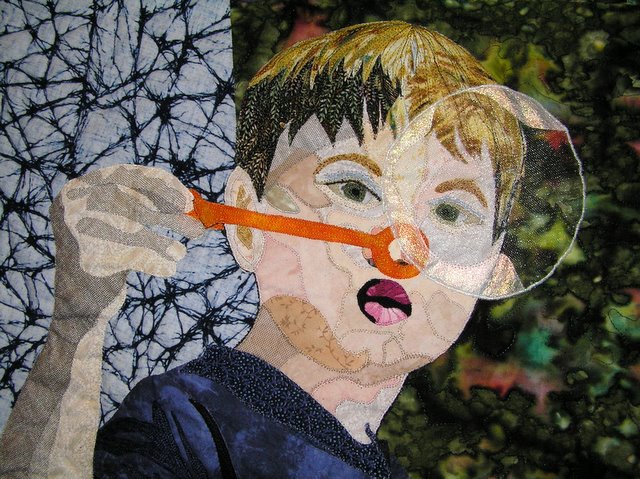
Here's a detail of the revamped face after threadpainting. The eye lashes really add a lot of life to it ...

I left the net on his part of his neck. I just could not find the right color of fabric to make it work for his neck.

The Bubble :
The shiny edges are made with Angelina Fibers.
The full circle is made with bridal netting/tulle, edged with an oplalescent thread and a satin stitch. Posted by Picasa

Oliver - 2nd Face Detail

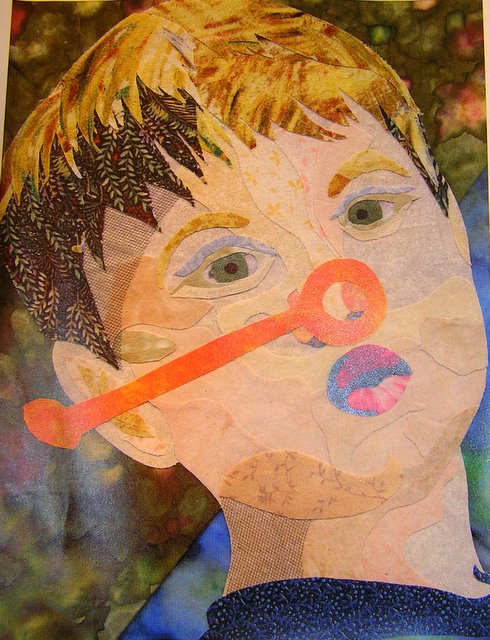
Here's the 2nd version of Oliver's face.

I took an online class through Quilt Univeristy (www.quiltuniversity.com) on Fabric Portraits taught by Marilyn Belford. She recently published a book by the same name that explains her technique. It really filled in the features of his little face.

This is BEFORE any thread painting. Posted by Picasa

Oliver - 1st Face Detail

Here's a close-up of the first face. You can see the netting, and how a double layer makes it look like cross-hatch shading.

This is also before any thread painting.

Where's his nose?!?Posted by Picasa

Oliver - Round 1

This is my first attempt at rendering the photo in fabric.

I was pretty happy with it, but I thought his face looked kind of cartoonish. Not enough detail--even though it sort of looked like him in it's simplicity ...

I used tulle/netting to create the shading on his arm and on his face. This was a technique I picked up from a book on fabric collage by Susan Carlson. I really liked the way some of her pieces turned out. The netting creted some wonderful shading without making it look like a totally different pice of fabric--and it wasn't too hard to do with a little Steam-a-Seam 2 Lite.

His "Little Blankie" at his knees is made from scraps of another (more traditional) quilt I had made for Oliver. Posted by Picasa

Line Drawing of Oliver

Posted by Picasa
This is the line drawing I developed from the photo below.


I printed a color copy of the photo as big as would fit on 8-1/2 x 11 inch paper. Then I went to work with my light box (I LOVE my light box!). It took a while to develop the sight to turn a photo into a line drawing. Then I took it to a copy shop and had them blow it up to about 3 feet. They can do this on a special copier anf they charge between $2-4. It's so much easier than trying to struggle with an projector ...

Oliver

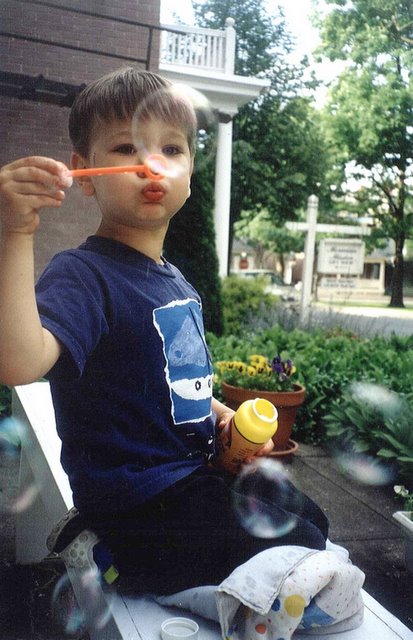
This is the original photo I took of my son when he was 2-1/2 years old. I knew I wanted to turn this image into a quilt, but how ...? Posted by Picasa

Monday, December 04, 2006

Thread Scarf

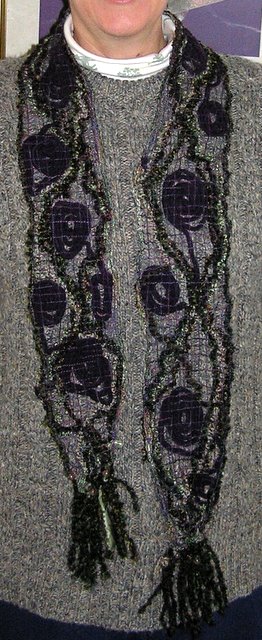
Posted by Picasa The thread scarf I made at Conversations in Cloth one night in August 2006.

The basic technique (very abbreviated) :
1. We used masking tape on the table to act as a template to keep the desired size and shape for the scarf.
2. Lay out a sandwich of water soluble stabilizer.
3. In between the stabilizer layers, threads, yarns, fibers, fabrics, scraps--anything that can be sewn-- are laid down in a desired pattern.
4. Use spray adhesive to hold everything in place
5. Sew! Sew! Sew!
6. Melt the stabilizer in water.

Presto! You have a treasured hand-made work of art!

The purple "globes" look like plums, or bunches of grapes, or even the eyes on the wings of a moth.

I used 12-wt. varigated quilting thread to hold the threads and yarns together. The heavier-weight thread has more body to hold the architecture. I don't worry about it catching on a snag and breaking. It's sturdy stuff!

Peace by Piece 2005 Challenge

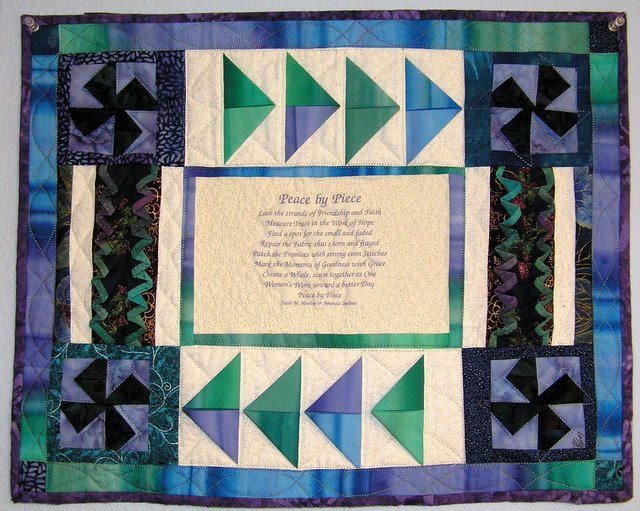
This is my 2005 Lakeside Quilt Guild Challenge piece. We were given the poem and a fat quarter of the blue-green fabiric.

I decided to try a few new techniques and got some Quitagami books from the public library. The flying geese, pinwheels and "knifepoint folds" are all folded fabric with 3-D effects. The points can be flipped up.

I like the general idea of this technique because you can get some neat 3-d effects simply by folding the fabric.


This was also my first attempt at free-motion machine quilting.

The hardest part of this project was not having a pattern to go by. The make-it-up as you go model does take more time because there's a lot of trial and error involved. Somethings just don't work as well as you had hoped ...

This piece hangs in my mother's sewing room. She's also a quilter. Posted by Picasa

Saturday, October 07, 2006

Three Jacks

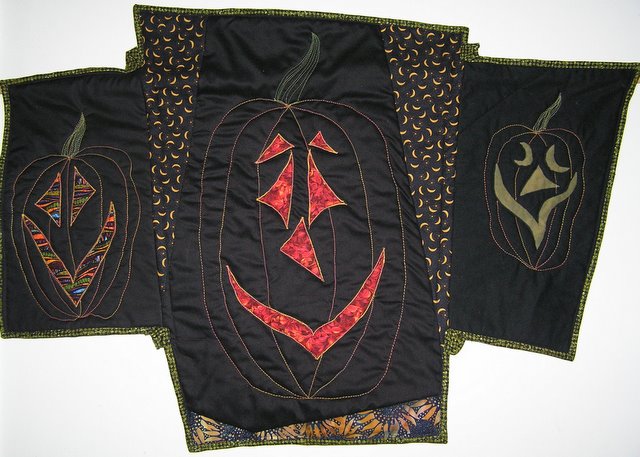
This was an experiment in trying new techniques.

Jack-o-Lanterns are quick and easy subjects!

Reverse Applique (Left & Middle Jacks)
1) The fabrics were layered : black on top, bright underneath(I only used 1 layer in this experiment, but you could use several layers), batting and backing.
2) Vague pattern was drawn on with chalk.
3) Sew around the shapes, and cut away the fabric until you get down to the layer you want to see.
4) Then zig-zag to secure the edges as for applique.

Soft-Scrub with Bleach Discharge (Right Jack)
I made a stencil out of contact paper and painted on the Soft Scrub. After 15 minutes, I rinsed it out. The light parts of the face is the same black fabric discharged of color. It doesn't look like much until you know the technique ...

After the general faces were done, I again chalked out the general outlines of the pumpkin shapes, and threadpained in the lines for the pumpkin and stems.Posted by Picasa

Celebrate!

I had seen journal quilts like this in Chicago, and wondered how thry were done ... Then I stumbled across Quilt University on the Internet. They were offering an online class in it over the summer. I was intrigued : How would an online quilt class work? (Remarkably well, actually!)

We pieced a starry night background. Each starburst/firworks has a bright patch at it's center. Then we thread painted back and forth and back and forth. 1 starburst typically took about 45 minutes to complete.

I used a variety of metallic and embroidery threads (had to buy some new ones to add to my stash, too!)

Tips on working with metallic threads :
1) Sew a little slower. The heat and friction can break these delicate fibers ...
2) Use a metafil needle, or a #14 topstitch needle. These have larger eyes that are easier on the threads.

For the sparkle, we were supposed to add sequins and beads ... I don't have the patience for hand-work, so I went the hot-fix route and used iron-on crystals. It's too bad the sparkle doesn't come through on this photo ... It's better in person!Posted by Picasa