Showing posts with label alpaca yarn. Show all posts

Sunday, December 08, 2019

Purple Alpaca Mittens on the Addi Knitting Machine

  I did it!  I made a pair of toasty warm alpaca mittens on the little Addi Knitting Machine.


The first thing I did was to ply 3 balls of this wonderful purple Alpaca yarn (Thank you, Nancy Schmidt, for gifting me the yarn.) into a bulkier yarn.  The bulkier yarn seems to work better on the Addi where you only have 22 pins.  It makes for a tighter knit, less lacy product.    3 balls of yarn plied together was just enough to make 2 mittens.


Thanks to this video for showing me how to make mittens on the Addi:


You can get the official pdf pattern here on Ravelry.

As always with Addi tutorials, practice makes perfect.   I ripped it out several times before I was happy with the final product.  Fortunately, these knit up quickly on the Addi, compared to doing it by hand.

The crucial points are where you might be likely to drop stitches, such as when you are doubling up the cuff.  The hardest part for me was the thumb flap.  I kept losing stitches along the edges, and even had to put an extra stitch on the waste yarn because I kept losing them when I only caught 3.  I finally got it to work -- with a little practice.

Here's a detail shot of the thumb.  I thought this might come out a little clumsy, but it looks ok, and it's solid (no holes) with 6 stitches for the thumb flap. 

My pattern was slightly different from the video, in that I did 4-5 extra (29 total) rows for the thumb flap, and 3 more rows for the fingers (dome) part of the mitten.  It probably would have been ok with the recommended 30 rows for the dome. 

If I were to make them again (and I just might do that!), I might do a shorter cuff, too.  Maybe only 2/3 of what she did in the video.


Here are my notes from watching the video:

1) Knit 5 rows (or more) on waste yarn.  Use a contrasting color so it's easy to see.
2) Make a slip knot in your main yarn, and loop it on the first peg.  Knit 30 rows for the cuff.
3) Fold over the cuff by reaching into the middle of your tube and attaching Row 1 (after the waste yarn) to Row 30.  This takes a little time ...
4) Knit 12 rows to the base of the thumb.  Go slow with the first row, as it will be the hardest.  Watch the stitches and make sure they drop below the lip so you don't lose them.
5) For thumb (16:41 min in the video),  Switch to Flat Panel knitting on 6 stitches only.  Secure the 3-4 stitches on either side of your thumb flab onto waste yarn as they are likely to fall off.  This is stitches 7-8-9-10 and 19-20-21-22.    Knit 29 rows for the thumb flap (She says 25 in the video). The lst row should be facing <.
6) Pick up the stitches on the waste yarn to either side of the thumb flap.  Try not to split the yarn.  Place them back on the open needles.  Don't remove the waste yarn until you know the stitches are secure.  It will be easy enough to pull out when you're finished.
7) Knit 30 rows for the dome of the mitten to cover your fingers.  You can add more rows if needed to fit your hand.  This will vary with the yarn you may be using, and the size of your hand.
8) On the last row, cut a long tail, and thread it through the final row of stitches on the needles.  This will create a draw-string action to cinch up the top of your mitten.  Secure the tail.
9) Turn the mitten inside out and stitch up the sides of the thumb.

That's it!  Toasty and warm!

Now I'm trying to decide if I will make a lining for these ... I guess I should try them without first to see if it's needed.

Saturday, December 30, 2017

Avalanche Alpaca Hat Finished

 
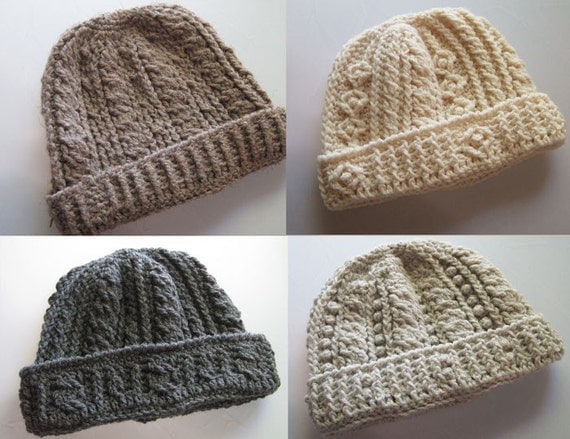
Detail of the crocheted cables and popcorn stitches.

I started this hat a few months ago with a few rounds a week.  Some new stitches for me, or rather simple variations on the basics of single crochet and double crochet.  Reading the pattern was a little bit of a challenge, but I worked though it, and it does look something like the photo on the pattern.

The pattern is from Crochet Garden on Etsy  : Rugged Mountain Hat Collection for Men.


I spun the yarn last year from a bag of alpaca roving from Sabamba Alpaca Farm.  Really nice stuff! It' is unbelievably soft and warm.  It's dense, too.  Tested at -11 degrees F.

 What immense satisfaction to know that I could create this straight from the alpaca fiber to yarn to making a practical and useful item!

DH says he wants one, too.  I told him it would take a while to spin the yarn from roving again ... He's willing to wait for it.

Toasty and warm!

Sunday, December 17, 2017

"Sing a Sleying Song Tonight!"


Feels good to have a new project on the floor loom.  Did the slaying (pulling the ends through the reed) this morning.  Only 156 ends, so it didn't take long.  ;-)

In the Christmas season, "slaying" (not sleighing) takes on special meaning for someone who weaves.  I'm sure someone has done a weaver's version of Jingle Bells.

This was a kit from the Yarn Barn of Kansas.  I worked up the warp Saturday morning -- It didn't take long with only 156 ends at 3.5 yards.  My friend Lynda came in the afternoon to help warp the loom.  It didn't take long to thread the heddles either, with so many fewer ends.

 So much order from previous chaos.  I love this part of warping the loom - not so much the threading--unless my friend Lynda comes over to help.    Then it's a social thing.

This part also makes me thing of stringed instruments -- harps or pianos -- Like I should be able to play music on this "instrument."

 The yarn is a bulky core spun alpaca from The Yarn Barn of Kansas.  Very soft.  Looks almost like roving, but it does hold itself together.  Oatmeal, Heather Gray, and Cream colors.

It's so thick, I was worried we might not be able to use my standard steel heddles, but I think they'll work just fine. 

 I loaded up one of my ski shuttles in preparation for weaving. 

The loom is set up as a double weave (again) just like my last project (the color gamp), so I don't even need to change my beads to help me keep track of the "lines," or the the shuttle takes through the shed and what treadles I need to work at any given place in the pattern.  


Here's the pattern from the kit purchased through The Yarn Barn of Kansas.

I expect this to weave up very quickly.  Soon I'll have a lovely warm winter blanket to snuggle down with!

Wednesday, November 01, 2017

Alpaca 2-Ply Yarn Spun from Sabamba Roving


Altogether, I got these 4 balls of 2-ply yarn.
I'm going to try to crochet one of these "Rugged Mountain Hats:"

Looks like kind of a complicated pattern, so we'll see how far I get ...

This is the tag that accompanied my bag of roving from Sabamba last year.  
It helps me remember where the fiber came from, and how much ...