
I've recently been fascinated with weaving patterned bands with the assistance of a rigid heddle to separate the pattern threads, making them easier to keep track of ... I did purchase 2 such heddles.

9-Slot Pattern Strings from Harvest Looms in Latvia
and a beautiful Plum Wood Shuttle

These heddles can be expensive to purchase--I did purchase the 2 above because they have the extra slots for pattern threads. I figured those would be difficult to make myself, requiring more precision than I can muster. I don't have ready access to a laser cutter in a Maker Space, although people have done that, too.
The basic rigid heddles are a little simpler, minus those extra pattern slots. I thought I'd be able to make my own basic rigid heddle with simple holes and slots. There are many options for materials:
- Cardboard
- Popsicle / Craft Sticks
- Plastic - Recycled, Template Plastic or Dollar Store plastic cutting boards (Easy to cut)
- Full instructions for making this frame loom include the heddle.
- Other examples of DIY Plastic Heddles #2 #3 #4
- An old clipboard made of masonite (This was my husband's idea.)
- Other Wood
- Wire
- Slats from an old broken window blind (Would these be rigid enough? Plastic or bamboo?)
- Strings (Technically, not a rigid heddle, but they hold the space for pattern threads). I use these on the inkle loom.

This one actually did work pretty well -- after some amount of cussing from me because the the sticks were sticking to me and not where they were supposed to stay in place with the glue. Eventually I worked it all out, and made a usable wooden heddle this way.
A few notes:

- We drilled the holes on the drill press, stacking up multiple sticks to drill them at once.
- There were some casualties that split and had to be tossed.

- I didn't really have anything I could get into the freshly drilled hole to sand down the rough spots -- Don't want it fraying my warp strings, after all. So I took a nail, wrapped a small bit of wool felt around the head, and heated the nail in a candle flame. Then I rubbed the hot nail in the freshly drilled holes to smooth them down a bit. We'll see if that did the trick, or not.

- As previously mentioned, gluing them down was a bit of a challenge. Eventually, I used another popsicle stick as a vertical spacer between the heddles.

Sophie-the-Newfie was our helper in the basement workshop, lending project support as only she knows how.

This one also worked reasonably well.
A few notes:
- The plastic was easy to cut to the right length and then cut into strips. I used my rotary cutter (the old one) for quilting on my usual cutting matt.

- Although I tried a variety of methods to put the holes in place, the best option was the drill press again. It left the cleanest holes removing the excess material. Other methods, like using an awl to poke through, caused a lot of stress to the plastic, and left a very clumsy unclean hole. It just sort of pushed the plastic aside, but didn't remove anything.

- When it came to lining up the strips, I went back to my sewing studio ... I lined up 2 strips of painter's tape on my cutting mat, and lined the strips up in place. The tape held them -- kind of like a stabilizer.


- Then I took two strips of bias tape (could have been fabric or ribbon--anything) and stitched through the tape, template plastic and bias tape. Then, I ripped off as much of the tape as I could get off.
- Then my husband glued and stapled it between the wooden headers and footers cut to the right size. He added some sides for more stability.
- The plastic got a little warped, not melted. I think it will still be ok for my purposes.


Both of them were difficult to cut the slots. Very difficult to get a clean cut with a box knife or other hand-tooled blade, without it tearing and being otherwise sloppy. It was nearly impossible to poke the holes through, as it then tore the slits. Eventually, I gave up and decided THIS is why you purchase a rigid heddle from someone who knows how to make them and has the equipment. It might have worked on a much wider, chunkier style of cardboard heddle. Or if I had cut the slats and treated it more like the template plastic heddle. Or if I had used a power saw to cut the slits ...
Heddle Keeper Box
And here we are back at the beginning. I originally purchased this little apple box at the local St Vinny's with the idea of possibly turning it into a box loom. Eventually, I decided it was the wrong shape (too narrow). But I loved the apples painted on the side. So I've designated it the Heddle Keeper.Also pictured is a lovely sparkly belt that could be used as a belt for backstrap weaving (as in the belt would go around my waist to hold tension on the warp strings hung from a door knob or other stationary point. I found the sparkly belt on the same trip to St Vinny's.
I think this little foray into making my own heddles has sufficiently cured me of wanting to make my own. The purchased ones are of much better quality, and I can afford to support the real artisans who make them. Here are some beauties to consider:
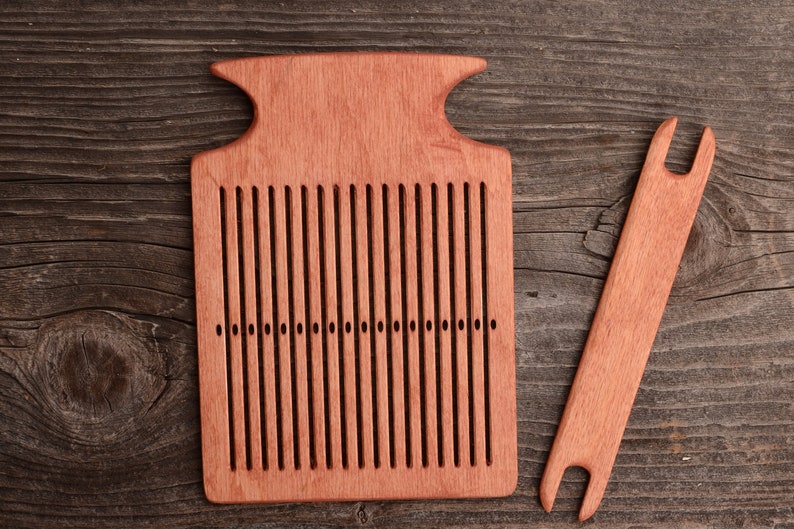
This beauty comes from KalinowayGaj in Poland, via Etsy.
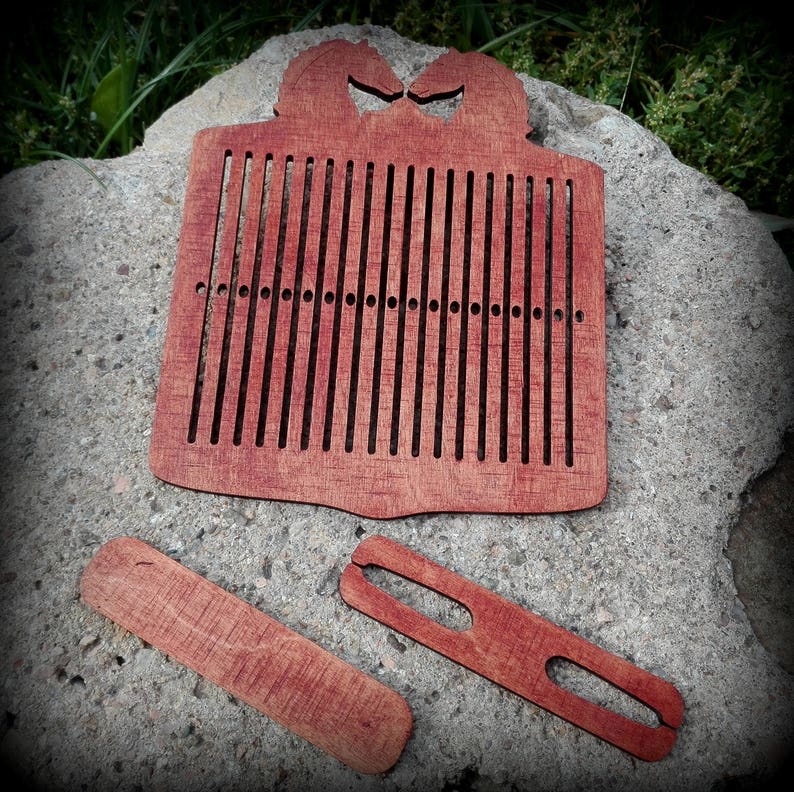
The horses head is one of the classic designs for rigid heddles.
Or this one from by VytuVatu
in Lithuania via Etsy.
Also see making a box loom out of a drawer.
No comments:
Post a Comment