Tuesday, December 05, 2006

Oliver - Almost done!

Here's the full view. I finished the background quilting. I still need to cut it down to size and add a binding.

I also plan to add some beads to the sunburst on the bubble bottle.

If you liked the 1st face, it's underneath this one.

It's only taken 2-1/2 years to get this far!
This has certainly been my biggest challenge so far! Posted by Picasa

Oliver - 2nd Face Detail with Threadpainting

Here's a detail of the revamped face after threadpainting. The eye lashes really add a lot of life to it ...

I left the net on his part of his neck. I just could not find the right color of fabric to make it work for his neck.

The Bubble :
The shiny edges are made with Angelina Fibers.
The full circle is made with bridal netting/tulle, edged with an oplalescent thread and a satin stitch. Posted by Picasa

Oliver - 2nd Face Detail

Here's the 2nd version of Oliver's face.

I took an online class through Quilt Univeristy (www.quiltuniversity.com) on Fabric Portraits taught by Marilyn Belford. She recently published a book by the same name that explains her technique. It really filled in the features of his little face.

This is BEFORE any thread painting. Posted by Picasa

Oliver - 1st Face Detail

Here's a close-up of the first face. You can see the netting, and how a double layer makes it look like cross-hatch shading.

This is also before any thread painting.

Where's his nose?!?Posted by Picasa

Oliver - Round 1

This is my first attempt at rendering the photo in fabric.

I was pretty happy with it, but I thought his face looked kind of cartoonish. Not enough detail--even though it sort of looked like him in it's simplicity ...

I used tulle/netting to create the shading on his arm and on his face. This was a technique I picked up from a book on fabric collage by Susan Carlson. I really liked the way some of her pieces turned out. The netting creted some wonderful shading without making it look like a totally different pice of fabric--and it wasn't too hard to do with a little Steam-a-Seam 2 Lite.

His "Little Blankie" at his knees is made from scraps of another (more traditional) quilt I had made for Oliver. Posted by Picasa

Line Drawing of Oliver

Posted by Picasa
This is the line drawing I developed from the photo below.


I printed a color copy of the photo as big as would fit on 8-1/2 x 11 inch paper. Then I went to work with my light box (I LOVE my light box!). It took a while to develop the sight to turn a photo into a line drawing. Then I took it to a copy shop and had them blow it up to about 3 feet. They can do this on a special copier anf they charge between $2-4. It's so much easier than trying to struggle with an projector ...

Oliver

This is the original photo I took of my son when he was 2-1/2 years old. I knew I wanted to turn this image into a quilt, but how ...? Posted by Picasa

Monday, December 04, 2006

Thread Scarf

Posted by Picasa 
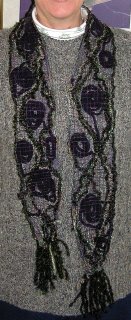
The thread scarf I made at Conversations in Cloth one night in August 2006.

The basic technique (very abbreviated) :
1. We used masking tape on the table to act as a template to keep the desired size and shape for the scarf.
2. Lay out a sandwich of water soluble stabilizer.
3. In between the stabilizer layers, threads, yarns, fibers, fabrics, scraps--anything that can be sewn-- are laid down in a desired pattern.
4. Use spray adhesive to hold everything in place
5. Sew! Sew! Sew!
6. Melt the stabilizer in water.

Presto! You have a treasured hand-made work of art!

The purple "globes" look like plums, or bunches of grapes, or even the eyes on the wings of a moth.

I used 12-wt. varigated quilting thread to hold the threads and yarns together. The heavier-weight thread has more body to hold the architecture. I don't worry about it catching on a snag and breaking. It's sturdy stuff!
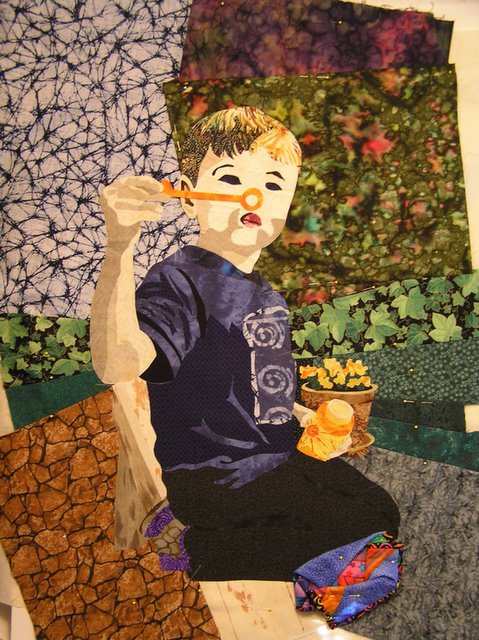
Peace by Piece 2005 Challenge

This is my 2005 Lakeside Quilt Guild Challenge piece. We were given the poem and a fat quarter of the blue-green fabiric.

I decided to try a few new techniques and got some Quitagami books from the public library. The flying geese, pinwheels and "knifepoint folds" are all folded fabric with 3-D effects. The points can be flipped up.

I like the general idea of this technique because you can get some neat 3-d effects simply by folding the fabric.


This was also my first attempt at free-motion machine quilting.

The hardest part of this project was not having a pattern to go by. The make-it-up as you go model does take more time because there's a lot of trial and error involved. Somethings just don't work as well as you had hoped ...

This piece hangs in my mother's sewing room. She's also a quilter. Posted by Picasa