Sunday, March 27, 2022

Autumn Copper Canyon Batik Quilt is Complete


Autumn Copper Canyon Batik Quilt.

I finished up this quilt this weekend. Yeah -- Another finish!

The pattern is my go-to jelly roll quilt:  Fuzzy Logic Quilt Pattern from Brenda Henning's Strip Therapy Booklet.  It comes together relatively quickly and the variety you get in a jelly roll gives it a scrappy yet unified look.   

My husband says it's no wonder I like this quilt pattern because it looks like a basket weave pattern [My other love!]


I've even started quilting these with a standard 2-inch diagonal grid done with the walking foot on my domestic home sewing machine.  Yes-- I do it myself.  See the photo above for my setup -- I have clamps hanging on bunge cords that pick up some of the slack and make it easier to handle.   It takes about 5 hours to cover the whole quilt at that stage, and another 2 hours for the binding.  I was not keeping track of time in the earlier stages ...


Colorful batiks set off with the purple sashing and the rusty border.


Once the quilting is done, it's time to trim off the excess batting and backing, square it up, and then add the binding.  The photo above shows my method for taming the binding as it unreels.  This small crate acts kind of like a yarn bowl.  I feed the leading end through one of the handle holes.  The crate keeps it from flopping around or getting tangled in the rest of the quilt, or rolling off ...  Works great!  Here I am sewing the binding to the back of the quilt.  It will be turned to the front in Step 2.

Step 2:  the double fold binding is folded to the front side where it is clipped until sewn down.  

Last year, I discovered these handy clips when I was making some bags.  These are great for bulkier places where pins would have a harder time.  They work great for quilt bindings too! 

This is the stitch I use on the front side to attach the binding.  One of those utility stitches along the edge, but every few stitches, it takes a bite into the binding. 

And the label.  I've started to standardize on that too.  I make a tube, turn it inside out. Then fold down the corners at 45-degree angles and tick them inside for a finished edge.  I insert a piece of freezer paper and press -- This acts as a stabilizer so I can write on the fabric.  Remember to remove the freezer paper, and pin it into a corner on the backside, and stitch it down along the 2 corners. And that's it -- a no fuss quilt label!    The idea is that you can lift the corner and see the label.


As the label notes, the batting is Hobbs wool -- I think this might even be the Tuscany wool because it's a bit puffier than the regular Hobbs wool batting.  This wider shot of the back shows a pleasing puff to the batt after it's been washed on delicate and dried on permanent press.  Yess- with care, you can wash and dry this wool batting. 

Here's a detail shot of the front showing some of the blocks and the puff of the quilting with that wool batting--and some of that luscious batik!

See the previous posts about this quilt (Yes, I changed the name sightly):

Autumn Copper Batik Quilt Top Finished

I thought there were more posts about this one, but I didn't see many other than the sandwiching days. 

Will this quilt be a gift for someone special?  I think this one turned out to be someone's favorite colors.   We'll just have to wait and see!

Friday, March 25, 2022

2 More Charity Quilts Made from My Mom's Stash

Lynn Mozingo made this beautiful quilt from the box of gray strips leftover from this gi-normous quilt.  By the time I had finished king-size quilt, I had no more vision for the leftover grays in my mom's stash.  I'm glad Lynn took it and ran!   Lynn heads up Charity Quilts for the Lakeside Quilt Guild (LSQG) here in Oshkosh.
 
I really like the way this one came out!  Perhaps I'll have to try this pattern myself!
 
She also made this one with some of the kid fabrics I'd given her. 
 
Both these quilts will be donated to Sleep in Heavenly Peace, which makes sure area kids have real beds with bedding to sleep in.  

I am so pleased that her stash is being turned into quilts and given to people in need!
Thank you, Lynn! 

I rejoined LSQG this month, after a 10 year hiatus.   At the meeting last week, we were all working on charity quilts -- A Quilting Bee!  I was sitting with one of the ladies who'd attended Quilt Camp in October, where Lynn had brought several boxes of my mom's patterns to give away to the ladies assembled.    This particular lady was very grateful -- and said she'd made several patterns already, and brought the patterns back for others to use.  I am glad people are getting some use out of that stuff!

Ma-- I hope you are also looking happily on these charity quilts!

Thursday, March 24, 2022

DIY Yarn Swift: Another Woodworking Fiber Project

In preparing for new weaving projects, I found myself having to reformat multiple skeins of yarn into balls -- because you can't run a warp from a skein.  Unfortunately, my little DIY yarn winder wasn't quite up to the job ...  I think there might be something stuck in the ball bearings underneath the turntable.  It wasn't turning smoothly. ;-(


I have another old metal one that my friend Lynda gave me. It worked, but it's difficult to figure out how the arms move.   Perhaps that's why the previous owner gave it up?


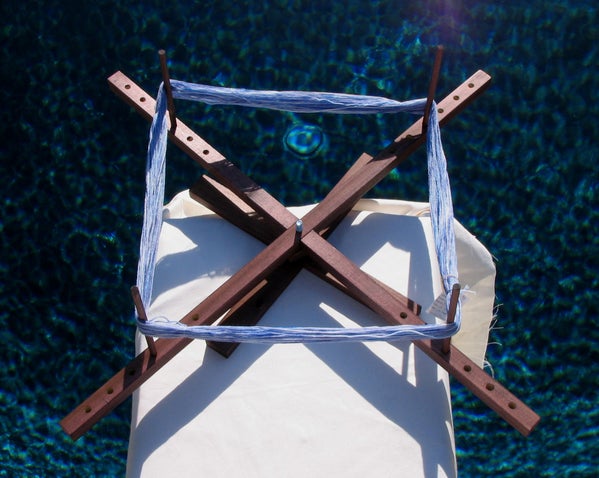
So I started looking for some alternatives and found this lovely Lacis 19-inch umbrella swift for a very reasonable price on etsy.  Completely adjustable and it folds down for storage.  It's bigger than I thought, but that's fine!  I made a little storage bag for it.


Before I found the umbrella swift, I saw this one and asked DH to make one for me.  The base will be similar to my warping wheel.  It's another example where they ask way too much money for what it is -- if you go to buy one.  He thought he could make this one easily enough -- but I'd have to wait until after taxes are done.  The plans are here if you are interested ... 

DIY Instructables

Saturday, March 19, 2022

Epic Spring Weaving Project Begins -- The Faux Ikat Scarf in Delphinium Blue

Hand-Dyed Warp for the Faux Ikat Scarf

Everything takes longer than I think it will ...  I've been wanting to wind this warp for the past few weeks, but I've been "shaving yaks" ever since.  [Granted work takes up a lot of my waking hours ...] What do I mean by shaving yaks?   It means -- before I can do this, I have to do that, and before I do that, I have to do something else ...  and it takes forever to get down to the yak under all that fur!  

First I had to decide on a project: Katherine M's Faux Ikat Scarf.  It was something I saw on Ravelry / Pinterest.  Then I had to order the Sept/October 2011 issue of Handwoven, to get the pattern.    But the pattern turned out to be for an 8-shaft loom and was a much more complicated project.  So then I found a similar pointed twill weave structure for 4-shaft.  I made some rough estimates for how much yarn I would need,  and ordered  the yarn ...  Hurry up and wait!   Last week, I wound the yarn into balls.

 
Here's the yarn I'm using JaggerSpun Zephyr 50/50 Wool / Silk Blend.
Pewter color, which means a light gray.

I was somewhat paralyzed by the math before I committed to winding the warp.    I know there are calculators to help with all these decisions, but what if I make a mistake, and I need more yarn than I ordered, and then I can't get any more? 

Choices! Choices!  There are so many possibilities!

  • How many warp strings do I need?  235 (221 Heddles plus 2 selvedges, and a few extra for repairing broken strings)
  • YES on Floating Selvedges
  • How long a warp?  3.5 yards  I'm making a scarf, so 1 yard will be sacrificed as loom waste.
  • How wide? (11 inches on the loom, expecting to finish just under 10 inches)
  • What sett will it be? (18-20 for a twill)
  • Yarn is a lace weight at 34 wraps / inch.  For a twill weave structure, sett should be roughly 2/3.
  • What reed?  10-dent reed with 2 yarns per dent
  • Yes-- I have a weave structure picked out that I think looks like the one I saw on Ravalry, but made for a 4-shaft loom.

The next step is to hand-paint this warp in an ikat style -- I am after a shabby-chic grungy look where the weave pattern will appear and disappear into the background according to the colors painted on the warp. This can be achieved by binding section of the warp where the dye will NOT penetrate.

What colors to dye the warp?

  • Indigo / dark blue / Wilton's Delphinium Blue
  • Deep purple
  • the background color (light gray/pewter) 

Will it be Procion/Dharma dye or Wilton Food Coloring?

The yarn is a lovely merino and silk mix, so if I use Procion, no soda ash because that will damage the fiber.  It has to be heat and vinegar to set the dye with either method.

Do I have to stretch the warp out on a table where I can be more precise about what color goes where?   Or can I wind it into a pan and add the colors a little more serendipitously?  Although I've done quite a bit of dying in the past 30 years, I've never painted a warp like this -- What if I get it wrong? Yikes!

I will default to what I know works ...  I think I'm going to bind off sections of the warp, and put the whole thing in the slow cooker with the Delphinium Blue and a little vinegar.  The open parts will take up the dye and leave the 

Saturday, March 05, 2022

In-the-Buff Bath Sheets

Scrumptious Texture n these 5/2 American Made Cotton Towels!
Made on my sturdy Kessenish 4-shaft Floor Loom
Yes-- this is the 4-shaft pattern.
All straight lines creating lovely circles!
I am in love! 
And they are really nice and soft, too.

I had to make a few adjustments from the Lunatic Fringe pattern kit since my weaving width is only 30 inches, not 36. 
I changed the pattern to run 29 inches.
On the loom, in formation even with stretcher bars, it shrank down to 26 inches.
After washing and fulling, it narrowed down to just over 23 inches.
That's to be expected.

3 62-inch towels on an 8-yard warp.  
Plus an shorter half-size towel with the remainder.
I expected that I would have to bind 2 towels together to make it truly spa size.

Here is a shot comparing the textured pattern weave with the modified plain weave for the hems.


For the washing and fulling, I left some fringe on, knowing it would be cut off when I got around to the hems.  I put a piece of the 5/2 cotton along side for comparison, so you can see just how much this yarn puffed up after being washed and fulled.  It's quite a lovely transformation.
 
This is really nice yarn to work with!  I didn't break a single warp thread on this project! 

Be brave!  Weavers are often reluctant to cut their handwoven cloth -- as if it will fall apart!
Here I am cutting the 3-1/2 towels apart.  I used a purple contrasting thread to be a divider.  
Easier to cut straight too.

Because my weaving width is narrower than the pattern was designed for, I had to make some adjustments.  I planned to weave a 30-inch width, that wound up being 29 inches -- rather than the 34-inches in the pattern.  By the time it was washed and fulled, that width was down to a little over 23 inches.  
 
The pattern had more than enough cotton yarn for 3 towels, so I took the third towel and split it in half. 
Zigzagged down the raw edges with my walking foot.
And then lapped it to the 2 remaining whole towels.
 
The photo above shows that lapped edge -- it blends so nicely, you can barely see the seams!
In the end, I think  my towels are just a little wider than the ones the pattern called for.
The textured part is woven to 62 inches under tension on the loom.  I think I'd make them just a little longer next time, too.

On the back side, I covered the "raw" edge with cotton twill tape 1-inch wide.
Yes-- I pre-washed the twill tape so I wouldn't have problems with differential shrinkage.
This also matches well enough. 

Here's the top side of the seam. 

This one shows the top side of the seam, and the underside with the twill tape.
This worked out better than I thought it would.


Here's I'm trying to show off the scalloped border.
 

Here you see the plain weave hem at the top of the photo.

Here is is stacked nice and neat.
I wish I would have planned better --  I'd have put on a longer warp to make another towel.  I had 1 whole cone leftover (about 1 pound +) 

I am so pleased with these, I think I will definitely make more cotton towels.
Maybe even some cotton blankets someday, too?
We'll see ...


Comparing the weave structure before (below) and after (above) washing and fulling.


This is what it looked like fresh off the loom, but before washing and fulling.

It's starting to take shape. 

 
 Another one showing it fresh off the loom.  The strings are still coming into formation.
 
 
Here's one while it was still on the loom, under tension.
 
Just to refresh your memory,  this is what it looked like on the loom, under tension.
 
 Here is the weave structure mapped out on my iWeaveIt App.
The 1-2 sequence in the plain weave for the hems.

The Fiesty Knitter did this project a while back on her 8-shaft loom.  
It's a more complicated version, but essentially the same. 

 
See previous posts about this project: