Sunday, February 28, 2016

Carrying Case for Singer Featherweight


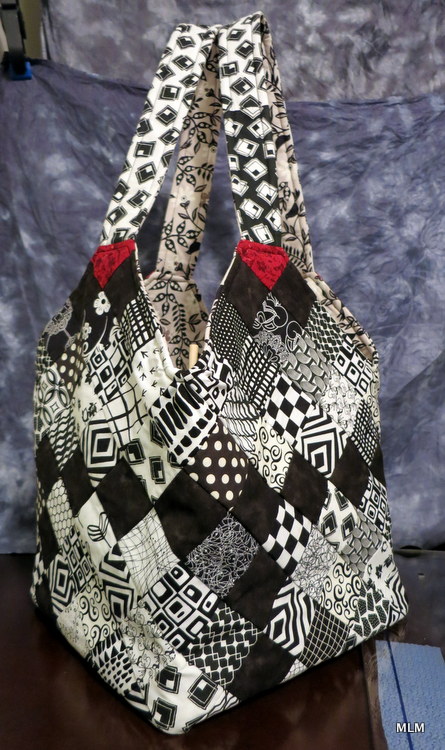
With the Mondo Bag class the last few weeks, and actually traveling with the Featherweight, I decided that the handle on the original carrying case was in "fragile" condition, meaning "it could go at any time."  It would break my heart to drop this beauty because the leather handle failed.  Not much leather left holding it onto the metal clips anymore. 


Here's my new carrying case, made (for the most part) on the Singer 221 Featherweight.
The lining in quilted to some batting.  In hindsight, I would quilt through all three layers, if I did it again.   For the pattern, I took apart a re-usable /recyclable grocery bag (It was about the right size -- the featherweight case fit inside).  That way, I didn't have to think too hard about measurements--I just traced the pattern.)

 Side view.

I spent some time fussy-cutting the fabric for the bag so that the birds would show.  In the end, I rolled the tops down so I could actually open the latches on the case easier, and the bird heads were covered by the rolled rim.   So ...


I decided to make one more piece--a cover/topper for the carrying bag, that doubles as a matt for the little 221 to sit on when in use.    It's the only place you can actually SEE the blue birds as intended. 

 The cover pieces is attached with some buttons and ever-versatile hair ties.


 The Featherweight sitting on it's little matt, which doubles as the cover for the carrying case. 

That's 2 projects completed on this little beauty!  We're getting to know each other.  Seems like I should have a name for her (like I name my cars) ...  I'm leaning towards Millie (short for Mildred). 

On another note (Sheila, this one's for you, as I suspect you're the only one who might make it this far ;-)  How do you like the backdrop in first and last photo above?  A friend gave me some dinner napkins as she knew I could dye them to give them a whole new life.  This one came out like storm clouds.   With what I've learned about PhotoShop and Textures, I'm much more conscious of the backdrops in my project photos now.  Funny --  I started with PhotoShop and Photography because I wanted to improve the pics on my blog -- sort of.  The PSE and Texture work kind of took on a life of their own, and makes the quilting and craft pics look not so polished.  Well --to be honest, essentially they are just snapshots of the creative work I've done.  Not every photo needs to be finished and polished with texture added [Here, I'm just trying to convince myself ...]

Thanks for staying with me this long. 

Mondo Bag


I took a class at Going to Pieces Quilt Shop in Appleton, WI, to make a Mondo Bag.  It was a good chance to try my little Singer Feaatherweight on a real project.  Straight line sewing, for the most part.  The fabric is leftover scraps from the 2 black-red-and-white string quilts I made.


If you're wondering how to make a Mondo Bag, see the pattern above.  You can also purchase extra fusible interfacing in case you want to make more, but already own the instructions.    From what they say, no one makes just one!  I'll pan on making another one at Quilt Camp in April.  ;-)

This is a really thorough page on making one in a workshop via Margaret Moorehead and Sue Houseman.  Lots of pictures.

 Here are each of my 4 panels, in case you're wondering about the layout, and how I manged the reds and blacks.  Reds in the corners marked for Centers and Handles. 


See--I really was sewing on this little vintage 1941 Singer sewing machine.  It worked great -- much better than my go-to machine at the moment!  The funny thing was--There were 4 people in the class.  I was the youngest at 45 years old.  The other ladies had relatively new Viking Husqvarna's -- which is my usual machine, but for this I wanted to do something on the 221--in an effort to get-to-know-her--o see how she runs.   Even the teacher was surprised it ran so well, and that I didn't have any problems.  Apparently, she had one for a while, and wasn't so lucky.


 Inside the bag, is a foam-core square covered with fabric,  On the underside, it's taped on with painter's tape.    The square give the bag some stability, and hopefully the bag won't sag once I put something into it.  There's a lot of room here!

 The bottom of the bag where the 4 red center corners meet. 

Monday, February 22, 2016

Broomstick Lace


I've been working on this lacy scarf.   It's crocheted, but you do use a giant knitting needle to make the open holes for the lace.

 I ran across this video to learn how to do it.  As well as this tutorial to deal with the curling issue (basically, she suggests adding one more row of single crochets to stabilize the series).

It's only 30 stitches for one row, so it didn't take long ...  Still this little scarf took me about 2 months to make, as I'd do 1 or 2 rows every week or so.  It seemed to help if the yarn sat on the knitting needle for at least a day to help shape it before going on to the next row.

I'd like to make more, but I'm having trouble locating some of these luscious variegated yarns at the local craft stores.  They are all stocked for baby pinks and blues --- Eeesh!


 The button is attached "shank-style" and then pushed through one of the lace holes.