Saturday, November 25, 2017

Progress on the Polar Bear


Made some great progress on the Polar bear wall hanging at Quilt Camp this past weekend.


I worked up the background with 2 pieces of crushed velvet that have been waiting for this very moment in time!

The one said Northern Lights to me as soon as I saw it.

The other one was from a bolt of of crushed velvet that I had planned to make a dress out of --  in a previous lifetime, before I started quilting.  Those days are long gone!

This came as a kit from Quilting to Pieces Quilt Company in Appleton, WI.  They used a pattern by XXX, modifying it from a strange lavender Holly Bear to a much more agreeable Aurora Borealis Bear with stars in the sky.   I took it a few steps further with the velvet backgrounds and the crazy quilting stitches to applique the bear down. 

I did use the whites and creams in the kit to make the bear, but then I crazy-quilted all the seams down with different stitches.   I was also considering using scraps and laces from my own stash to make the bear out of linens and wools (left over from my wedding dress), but I didn't quite get around to that ...  Maybe another round?

I also trapuntoed the bear to make it pop out more -- more of a 3-D effect.  The bear is stitched to a piece of black fabric, then he has an additional layer of batting (actually -- recycled from a nice thick and puffy mattress pad).

I got so far as appliqueing the bear to the background, adding the borders, and sandwiching the batting and backing.  I did use the batting layer as a stabilizer for the velvet.  So the velvet is quilted to the batting before the bear was added on top.  I still need to go through all 3 layers now to finish quilting it properly.  Then the binding, label, and hanging pocket for the final finish.  The end is in sight!


Stumbled across this picture on Pinterest, but the source was gone.  If I knew where it came from, I would certainly give credit.


Mande's Orange Star Quilt Top is Complete


I actually finished this top BEFORE I left for Quilt Camp last week.  I was afraid the pieces would get mixed up and out-of-order if I dismantled it and took it down to transport it to Quilt Camp.  I just knew the blocks would get out of order, and it would be a disaster waiting to happen.

It's been a remarkably difficult quilt top to photograph, as the colors don't usually show true to life.  This is as close as I've seen it (minus the flecks of sunlight on the lower left quadrant). 

This way, I had something for show-and-share. And I could hand it off to my mom so she could do her share ... which is to get a backing, and get it quilted.  I'll probably wind up doing the binding before next summer.

We'll plan on having it done by next August when my sister comes for her annual visit from Japan.   Then we don't have to spend $150 (or more) just to mail it to her.  Postage is crazy to Japan!

Monday, November 13, 2017

2 Iron Caddies


At Quilt Camp in October, I decided I needed a decent iron caddy with pressing mat.  Until now,  I've been swaddling my iron in an old scrap of batting.  It looked so forlorn and ragged with that humble wrapping.  Laura had a nice iron caddy tote that opened into a decent and portable pressing mat.   It looked simple to make, so I searched the Internet and found a pattern from TriCounty Quilters.

I had just about everything needed.  All I needed to purchase was Insulbrite and the silver iron fabric.  I had fabric, and warm-n-natural in my stash already.


 Top view with an iron inside it.

This is how it opens up.
You can also see the stitching lines, which also serve as the folding lines.


Then I showed my mom, and of course she wanted one, so I made one for her, too.  Holly fabrics.  [Shhh! don't tell her -- It's one of her Christmas presents.]   If my Auntie Rosita were still around and quilting, I'd have made one for her, too. 

Sunday, November 12, 2017

Setting the Twist


An important step in spinning your own yarn is to set-the-twist.  Basically, you skein your newly plied yarn, secure it, then give it a 10-minute bath, and hang it up to drip dry. It allows the yarn to "bloom" (if it's wool) and relax into the new positions.  In other words, the twists start to sort of "hug" each other.


Step 1) Used my DIY skein-winder to change the format from ball to hank.
The skein-winder works great!  [Turns out having the expandable mug rack is a plus because it's adjustable, allowing for different skein sizes.  *]

Step 2) Secure the strands to prevent tangles.  I used a bit of kitchen twine because that was ths closest thing at hand.  It helps to use something that is a contrasting color as it makes it easy to differentiate when it comes time to cut those ties off.

Here is the newly skeined yarn, hanging up and awaiting it's bath.  Compare this to the yarn at the top of this post.  There's quite a bit of variation -- thick and thin.  Just wait ...


Step 3)  Give it a 10-minute bath (add a little wool wash) to open the fibers and allow them to relax. Repeat until the water runs clear. 

Here is where my friend Lynda would caution me NOT to use water that is too hot, as it could felt the fibers together, and that's not what I'm after here.  Make it warm enough that you can put your hand in it--like bathwater.  You don't want to "shock" the fibers.


I was surprised at how much brown stuff came out in the water.  The roving seemed very clean as I was spinning it -- even after it was balled and skeined ... so I gave it second round in a clean batch of water.   Ah--much better!

Step 4) Squeeze out as much water as possible without wringing the fibers.  You don't want to felt them together at this stage.


Step 5) Wrap the wet skeins in a towel, and try to pull out more water that way ...

Looking a little bedraggled at this point ... but stay with it to the end ...


Step 6) Hang them up to drip dry.  You can add weight if you want to tamp down the springiness (as for weaving) or let it stay springy if you're going to knit or crochet with it where that added energy is an asset.

This time of year (November) and in my house, it took several days for the skeins to completely dry.  Each day, they plumped up a bit more, got nice and fuzzy, and gained a nice luster.


Step 7) Back on the skein-winder ... to process back into balls/cakes again.

This Sabamba alpaca yarn is so soft -- a real luxury to work with it!  After it was dry, the yarn had visibly "plumped up" and was thicker than before the water treatment.  I was glad that the DIY skein winder adjusts to different sized skeins.  I needed a different setting AFTER the water bath treatment than before.  Compare this one to the one at the top of this post. 


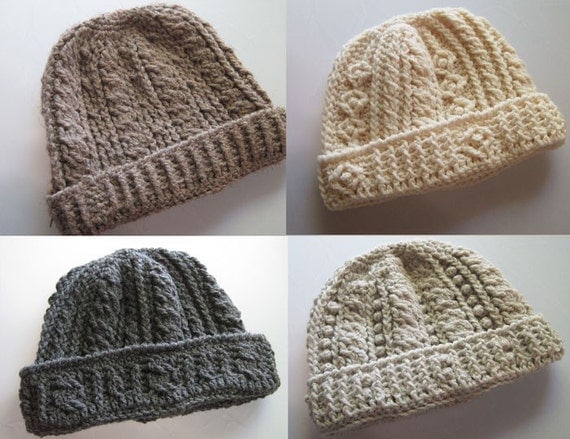
Ready for my next project ...  which I think will be one of these hats--crocheted :


Or maybe I'll actually learn to knit (after all these years!).  I just signed up for a beginning knitting class at Craftsy.  It would give me so many more options for making stuff -- especially those little Bob Cratchet fingerless gloves.  I had a really beautiful (and pricey) pair that I loved and misplaced.  So I'm motivated to learn how to make them myself now.

I learned to set-the-twist 20 years ago at a class I took in Madison, WI, when I first learned to spin yarn at the Weaving Workshop.

If you want to know more, I found a good explanation/tutorial at Craftsy : How to Finish Hand Spun Yarn.

Saturday, November 11, 2017

7 Days 7 Photos from your Life in Black and White - No Explanations

Day 1
7 days, 7 black and white photos of your life. No humans. No explanations.
I was nominated by my sister, Amanda Yoshida.
Play along if you want to join us ...

This is a meme going around FaceBook these days.  I thought I would compile theme here as a series for future reference.

Day 2

Day 3

Day 4

Day 5

Day 6

Day 7
 

Day 8 (Lagniappe for sticking with me this long)

Sunday, November 05, 2017

Surface Design Possibilities for the Curry & Red Spice Quilt

 Red center; Sepia corners, smaller gold sides.
This one is getting closer to what I'm looking for ...   That gold should be a little more subtle.

I've been playing with layers in PhotoShop trying to visualize the next steps for this quilt.  I decided it wasn't ready as is for quilting yet.  It was a nice background for some additional work. 

My friend Sheila at Idaho Beauty reminded me of Cynthia St. Charles surface design work where she adds stamping and block prints to her quilts--to an amazing and wonderful effect!  Sheila counseled against the Shiva Paint Sticks as I'd probably want to wash this one day.  So I'm leaning towards dry-brushing with fabric paints.

I'm still trying to settle on the right colors ... burgundy and a forest green?  Translucent graphite?
I want these add-on colors / layers to be see-through, where the colors of the fabric beneath show through. It's meant to add an extra dimension, and to tie everything together.

 A few people suggested using white for the stencil design.  
I'm not crazy about this one, so it was good to trial it.
It really makes the background pieced quilt look washed out and pale.

This was one of the first combinations I tried -- Red with gold in the corners.
Not bad ... but not quite right either.

It will take a while to develop the right technique, so best not to start with the center mandala!

I need to do some measurements, too.  The stencil is supposed to be 23 inches across-- which sounds pretty big, until you think about covering a bed-size quilt.  That can fill in the center middle, and corners in quarters.  But what do I do with the spaces in between?


Somewhere I have a metal trivet that I purchased for rust dying.  But it's also been wonderful for stamping with acrylic paint.  I did some experiments with that years ago on a baby-shit brown piece of dyed fabric that I thought should have been destined for the trash.  Turns out that unappealing ocher color turned out to be a good neutral background for the stamped prints.  And the colors actually make it look like they are floating in 3D -- like ornaments hanging in the air.


Saturday, November 04, 2017

What would you do?

Here's where I wish I still had my old Art Quilt Group to bounce ideas onto.  
I am in need of an art consult ...  What would you do? [Sheila at Idaho Beauty-- I know you'll have some suggestions!]

I was going to sandwich this quilt top at Quilt Camp in a few weeks, but I'm feeling like it needs more work (surface design) before it goes under the needle ...

 This is the Curry and Red Spice Quilt Top. 

Can you picture it with the following mandala stencil on it?  It's supposed to be 23 inches wide.
The next question is : What medium?  Some kind of transparent paint? What color?


I've been toying with the idea of putting a crane on it in silhouette as I did here :
This was a small journal quilt, and I don't think a bigger-than-life crane will work very well on a bed-size quilt.  It would be monstrous.  And the paint I used here was too opaque, I think.   
Maybe Dyna-Flow or even those oil crayons we had to buy when they were hot ...  But what color?

Wednesday, November 01, 2017

Alpaca 2-Ply Yarn Spun from Sabamba Roving


Altogether, I got these 4 balls of 2-ply yarn.
I'm going to try to crochet one of these "Rugged Mountain Hats:"

Looks like kind of a complicated pattern, so we'll see how far I get ...

This is the tag that accompanied my bag of roving from Sabamba last year.  
It helps me remember where the fiber came from, and how much ...