Monday, August 28, 2023

Progress Notes on The Mountain Cucumber Coverlet

  This is a bundle of woven yardage (the first 2 panels) of the Mountain Cucumber Coverlet.


Treadle Beads (on Steroids) 

There are so many treadle changes with this pattern, that I needed 4 rows of beads to fit them all in.  

The photo above is from last April when I began weaving on this epic coverlet.  It shows the 4 rows of beads on top in "resting position."


For smaller patterns, I used a string on top of the beater, but for this, we used metal rods and wooden truck tires for beads.  They are thinner than regular round beads and the hole is larger, and I can get more on the rod.  There are 4 rods for this project. 


I have them labeled A-B-C-D with markers (a red bobbin) signalling the end of each movement / motif change.  


Each bead tells me what treadle to push in the correct sequence, so I don't have to struggle with trying to read it on a piece of paper.  The beads are easy to see, and pushing them over is much more in line with the movement / feeling of weaving.  I did a video a few years ago to explain how it works.  Although, my technique is better now!  These days I know to pull the beater bar in the center for an even beat at the fell line.  [We learn as we go!]

Eureka! It's Working: Weaving the Red and Black Circle Scarf on the Loom

  • This video explains how to "program" the beads.

New Video Demonstrating the Bead System for Tracking Pattern Treadles on the Floor Loom


[This photo is from the back of the loom, in case things look reversed.] 

I start with row A and move it down to the beater bar.   In the photo above, I'd already moved onto the B-row.  The ends of the rod are attached with hair ties.  If I have to break for any reason, I mark my place in the sequence with a little clip.  So far, this has been working out marvelously!

When I started, my body was sore after weaving so long.  Since then, I have learned to pace myself -- I weave for 90 minutes, then take a break and weave another 90 minutes.  That seems to work out well for me now.   It's good exercise, moving arms and feet.

There are a few "tricks" to help make sure I'm on track, making panels that will match up when it comes time to seam them together into the full-size coverlet.

One is to keep track of what you did on a piece of adding machine tape.  Inch-by-inch I kept track of each movement in all 7 blocks of panel 1.  You don't let the paper tape roll onto the cloth beam, but roll it up by itself so you can use it to make sure you're on track for panels 2, 3, and 4.  So far so good.  I'm within a 1/4 inch of my targets.

The other is to keep track of the length of each panel with a 120-inch measuring tape.  This is pinned to the right side of the cloth, "as the flowers grow."  I know that each block is about 15 inches long.  And I'm keeping track of where that falls in each panel.  So far so good!

PHOTO

I've found that I need to use a temple to keep the width of the woven cloth closer to the width of the warp through the reed.  I don't want it to shrink up too much.  As it is, the only strings that are breaking now are at the edges / selvedges, but that easily fixable.

So far, I have woven 3 practice blocks --mostly to learn the pattern, and develop a steady beat, and consistent 15-inch block.  I have 1 panel of 7 blocks woven, and I just finished 3 blocks into Panel 2. 

Things I'm keeping track of:

How often I change bobbins (blue for pattern weft; white for tabby)

Where each days weaving ends ...  Am I on target for where I expected to be? [So far so good!]

Today's weaving seemed to go exceptionally well.  The time flew by, and it felt good!  I feel good!  Not sore or tired at all.

Braille for your feet!

 A few weavers recommended marking the treadles with rubber bands (I used hair ties because they are more durable) so that you can feel them with your feet.   I know that the hair ties are on Treadles 2 and 4, so I've learned to feel for them if I know I'm supposed to be pressing even-numbered treadles.  I tried it a few weeks ago, and it worked great!  I didn't have to do any un-weaving that day!   And it seemed like I saved a fair amount of time looking down to make sure I had the right treadle.

The photo above shows a similar system on the new 8-shaft loom.  The 4-shaft loom on which I am doing the coverlet project has a lot of cotton lint from the cotton warp and tabby underneath it.  I decided to spare you that untidiness in order to demonstrate the basic idea.  I put a hair tie on each and every treadle.  If I didn't need it, I pushed it up and out of the way.

Sunday, August 27, 2023

Half Way There on The Mountain Cucumber Coverlet


Be brave and cut your cloth.  I used 2 lines of red thread as a cutting guide.

VIDEO - Unfurling the first 2 panels of The Mountain Cucumber Coverlet

Unrolling the first 2 panels of The Mountain Cucumber Coverlet.
This shows the underside.

I am so pleased with how this is coming out!   I LOVE this pattern.  There is so much going on in it to hold one's interest.  I've already decided to make another one and set it up on the bigger, wider 8-shaft loom with a sectional warp to manage more even tension.
 

I am making progress on this epic coverlet project.  I've been trying to weave 1 15-inch block every weekend since I started.  It takes me about 3 hours to weave 15 inches on this coverlet.  That's nearly 300 pattern shuttle throws (thicker blue yarn) and just as many tabby throws (natural cotton) right behind for each block.  That means about 600 passes of the shuttle per 15 inch block.

After I finished the 2nd of 4 panels, I cut it off the loom.  Because it was such a long warp at 15 yards, there were some tension issues at the edges.  Although I separated the warp with paper between each layer, it "cigared" at the edges, and I had to do all sorts of things to correct it so that I'd maintain a straight fell line.  Better to cut it off half way and make adjustments with a fresh tie-on.  


The Worms Converging (or maybe cucumber vines?)


This photo compares the worms on the front and back sides of the cloth.


Saturday, August 05, 2023

Sectional Warp Beams: DIY or Purchased?

I've been reading Mary Meigs Atwater's The Shuttlecraft Course in Hand Weaving, which she wrote back in the 1920s.  One of the first things she says is that a new weaver should do sectional warping, and not try to warp a loom with other methods which she deems a complete waste of time.  Although I  am no longer a new weaver,  I am always on the hunt for techniques and tools that will help make weaving easier / smoother.   Winding on with even tension and otherwise dressing the loom is something you have to make peace with if you want to do the fun part of weaving.  Still, even though I've found techniques that work for me, that step is still a pain point.

I got a bonus at work, and decided I wanted to spend it on a sectional warping beam for my big "new" 8-shaft loom.  So I called Bruce at Kessenich Looms, knowing he's getting older and if I wanted one, I'd have to order it before he retires.  Turns out, he spends most of his time on the phone helping people refurbish their older Kessenich looms.  He won't build me sectional warp unless I ordered an entirely new loom.  Although, he seemed to think it would be easy enough to make the 4 rails with the wooden pegs spaced 1 or 2 inches apart -- "Just find a local woodworker ..."

Although my husband and I have made several DIY weaving implements, in this case, I concluded there's a certain amount of precision required with this project, and I would just as soon spend my precious time outside of work weaving or quilting, rather than woodworking.

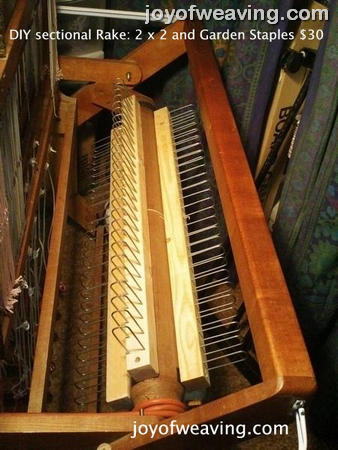
I did find a Joy of Weaving post about a DIY sectional warp beam rake and guides ...  I didn't think those garden staples would be durable.   Or maybe they were of better quality back when this sectional beam was made?  


Although I may ask Janna's dad to make the kind with wooden pegs for the smaller loom.   The photo above shows the one Schacht makes.  This is similar to the one Kessenich had, too, with the wooden dowels, or pegs.  If they were spaced 2 inches apart (as opposed to the 1-inch variety), it would be do-able as a DIY project.


In the end, I decided to purchase the Leclerc sectional warp beam along with the tension device from The Woolery.  

The description says: 

"Many weavers use the Leclerc 1" section beam on non-Leclerc looms (because very few manufacturers offer SWB in 1"). This will require drilling new holes on your warp beam. The results are excellent and the 1" sections seem to be more reliable (than 2")."

From the looks of it, I'm pretty sure we can make that work on the beam I have on the 8-shaft loom -- and save oodles of time trying to make the rails, drilling the holes and trying to keep them evenly spaced.   I'm sure I'll have additional posts as we do what we need to do to make it work on the loom I have. 

I also ordered the Leclerc tension box, which is an essential tool for sectional warping.  Again, this looks like it would be simple enough to build, but who's got that kind of time?  Or the equipment?


Warping a sectional beam via warping board (Part 1)


 Warping a sectional beam via warping board (Part2)

I'm not crazy about having a giant spool rack with 30-40 spools on it either, so I found a way to use my vertical warping mill to run warp chains for each section, then run those through the tension box to get them onto the warping beam in sections.   I think that method will work for me, and save having to purchase extra equipment, and the sheer expense of purchasing or winding so many spools, and finding a place to store all that extra equipment.

I am so enjoying the coverlet project, that I think I would like to put on an extra long warp and keep that going.