Sunday, September 27, 2020

Farmer's Wife - Week 3: Blocks 34 Flock and 59 Night & Day

Handmade Karma is not running the tutorials for The Farmer's Wife Quilt block tutorials in consecutive order.  They seem to be mixing the blocks more according to techniques?  Hence, you won't be seeing Blocks 3 and 4 this week, but instead blocks 34-Flock and 59-Night & Day.    They put together a schedule so that we can finish the sampler quilt in a reasonable amount of time (1 year vs. 2-3 years.)

I will say that working on a sampler quilt with a different block each time keeps me on my toes.  Your brain has to keep working ...  What colors to use, in what parts of the block?  What technique to attain the best results (paper piecing, templates ...)  How big do I have to cut the pieces to make sure they cover the intended space?  Plus extra room for seam allowances?  You never get into a production mode making multiple copies of the same block, or technique as you do in other quilts.    In some respects, practice makes perfect, but in a sampler quilt, each block is the first one.  You never get to auto-pilot with a sampler quilt.  Ha!  What a way to give my brain a workout! 


Farmer's Wife Block 34 - Flock

I am using the same beautiful blue Stonehenge.  That may be the unifying color / fabric that ties the whole thing together.   And some of that curly willow green.    I used the sew 2 oversize squares on either side of the diagonal, then cut between the stitching lines.  That seemed to work out well.  Again, I miscalculated, and wound up with twice as many half square triangles as I needed.  That's ok.  I'm sure they'll be utilized in some other blocks later in the project.   [Despite the wonky photo, the block is square.]


Farmer's Wife Block 59 - Night & Day

That Stonehenge Blue for the night sky, and Sky Blue Fossil Fern for day.   With white and a pale green for the star stripes.   This block used the paper piecing method again.  You build the wedges with 3 pieces of fabric, then trim it down, and sew them together.  There's a great confluence of seams on the back side.     Paper piecing is still not my favorite technique.  Even with practice, I seem to have to rip out stitches because when I miscalculate how the fabric will flip -- and then find out it doesn't cover the patch it was intended to cover.    I finally got it in the end ...  and the points are pretty darn good on this block.  

The name of this block makes me think of Fred Astaire and Ginger Rogers dancing ....  


Or the movie Ladyhawke when the curse is broken during an eclipse when they have a day without a night and a night without a day ...  Ha!   With those two movie references, try to guess my age!

Saturday, September 26, 2020

Inspiration from an Antique Crazy Quilt Block

Antique Quilt Block

I picked up this bit of loveliness on esty for just over $7 delivered.   It's a block cut from a larger antique crazy quilt.  I wanted to see it up close and study it ... WOW!

  1. The fabrics used are all silks, velvets, taffetas ...  
  2. The stitches appear to use a nice thick silky thread with a lovely luster to it.  Also neat to see the stitches on the back.
  3. Even the back is some kind of fancier fabric with a silky finish.
  4. Crazy Quilts traditionally had no batting layer.  Just the top and the back, which probably made it easier to do the fancy stitches and embroidery work.


The little crumb / crazy quilt blocks I've been doing with scraps are a different animal entirely!

I am planning to frame it and hang it on the wall for safe-keeping -- out of direct sunlight of course.   

My Collector Friend Karla said that there was a time you could get crazy quilts cheap.  I've only ever seen them starting at $300, no matter the condition.  I was speculating that this etsy seller might have cut up the quilt because parts of it may have been in tatters?  Who knows?  This particular square looks to be in excellent condition -- not worn or deteriorating fabrics.  

If you want to learn more, read The History of the Crazy Quilt from American Patchwork & Quilting or this short piece on Crazy Quilt History: A Vicotorian Fad by Womenfolk..

Friday, September 25, 2020

Autumn Tints - Farmer's Wife Block 2


Autumn Tints using the Tutorial by Hand Made Karma for the Farmer's Wife Sampler Quilt.

I chose the colors this time in a scheme after The Shade Tree Quillt, 

which is on the bed now, so I see it every day.

Although when it came time to making the block, I couldn't find the leftover black fabric.  Did I use it up on some other project?  Maybe ... but I found something similar.   Then for the green, I used some other leftover green that was also close to what I had in mind.   No biggie.

Full disclosure: This block looks easy, and it should have been, but I think I made every mistake it was possible to make.  First time around I cut the blue squares at 3 inches instead of 3-1/2 inches.  Do over.   Then I sewed the 4 blocks together backwards.  Another do-over.  Finally got it, and trimmed it down, but I think it's lacking the seam allowance and may be too small for the final quilt.  

Lesson learned: Follow the directions, and don't assume I know what I'm doing just because I've been sewing for most of my life.  There's always something new to learn.

Maybe I should just plan on making a practice block, knowing I'll do something wrong before I get it right.  That is how experiential learners learn. ;-)

Wednesday, September 23, 2020

Attic Windows - Farmer's Wife Block 1


 The Farmer's Wife Block 1: Attic Windows

The first block is done!

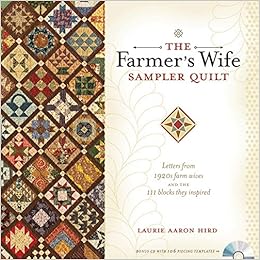
The journey begins ...  I am using the Farmer's Wife block tutorials by Hand Made Karma based on this book:


The first block is for Attic Windows.  Yes, I have the books, but I don't have an easy way to run the accompanying CDs anymore--Time and technology march on.  We do have a new printer, so I'll be able to print HMK's templates now!  Hurray!  I am printing to a cheap pulp paper that should be easy to tear off.   Fingers crossed.

 Fossil Fern Bundle

I purchased a fat quarter bundle of Fossil Ferns in the hopes that there will be some coherence to the overall project.  There's a good balance of lights and darks in this bundle and a nice variety of colors.

Here's the back of the block with the paper piecing notes and sewing lines.  I am using some cheap newsprint paper, as from a drawing pad for kids.  This paper goes through the printer and tears easily once pierced by the machine needle, so it's a good choice for paper piecing.   I pulled off a few pieces here to test it.  It should work fine.


It's been a long time since I last did any paper piecing, so I had to consult a few videos as a refresher.  

So far so good ...


Sunday, September 20, 2020

Plans for The Snow Berry Quilt or Plum Dumplings over Winter Break


Snow Berry Island Batiks Strips / Jelly Roll.

Thinking out loud: My intentions for this lovely jelly roll.
The purples remind me of plum dumplings -- and the grays reminded me of winter after the Christmas lights get put away, but there's still a little sparkle from the sugar plums, tasty treats, and the light on the snow on a clear day.  It made me think of Harry Potter the year he stayed at school over the winter break.  Hence the provisional name: "Sugar Plum Dumplings Over Winter Break."


Here are some of the first blocks, with the gray accent strips sewn on.

Still Need to pick out something for the border, but that can wait.


Phoebe's Flower Box Quilting Tutorial

by Jenny Doan at Missouri Star Quilting Company.

I think this is the same basic pattern for Fuzzy Logic (from Strip Therapy) or the same pattern I used for the Copper Canyon/Autumn Copper Batik and Stained Glass Quilts. 

Sunday, September 13, 2020

Desert Blooms Double Slice Layer Cake Quilt Top

Desert Blooms Quilt Top

It's the same pattern as the Double Slice Layer Cake Quilt I did out of Christmas fabrics a few weeks ago.  It comes together fast. 

I was in the mood for another double slice layer cake quilt, I bought a 2nd layer cake called Sunset Blooms:

Plenty of contrast, colors, and varying prints with this set.  I hope it comes together well.

1 Layer Cake with 40 10-inch squares should be enough to make a twin-size quilt.  2 layer cakes would be enough for a queen-size quilt.  I don't need to go that big.


For reference, here is the Jenny Doan video tutorial explaining how to make this quick quilt.


Here it is on the design wall.  Some of the blocks changed places since this photo was taken.  I can see how that the upper left corner block is turned the wrong way.  

With it on the design wall, my heart sank.  Not my color pallet.  Too much yellow.  In the color mixing, it looks way too brown for my eyes.   I think I'm going to have to put this one away for a while.  Perhaps it will look better to me sometime in the future.   Then again,  this color combination will make someone's heart sing ...

Someday in future it will get borders and the finishing treatment.

Wednesday, September 09, 2020

Farmer's Wife Sampler Quilt

Am I crazy for wanting to start this forever project?   Maybe I feel more of a kinship for this one since I grew up on a farm in north central Wisconsin.   I just ordered the original book.


I was inspired by Hand Made Karma's updated colors in their Farmer's Wife Quilt Along from a few year's ago.   The depression era drabs and browns in the original books don't so anything for me.  But when it's updated with Fossil Ferns or batiks or Stonehenge -- Wow! 

It looks a little easier than the Dear Jane or Dear Hannah quilts. Yes, I have that book, too, and never felt compelled to actually begin it.   


Gnome Angel offered 2 Quilt-Alongs with sampler block tutorials for Vol. 1 (1920s) and Vol. 2 (1930s).  [I absolutely love her Red Barn image above!]  She also curated bundles of fabric at The Fat Quarter Shop, though it looks like it is no longer available.  She also works with Marti Mitchell's tutorials and templates.  Marti Mitchel even did a set of template conversion charts for most of the blocks.  Gnome Angel has a really helpful blog post about getting started, which includes info about gathering supplies and choosing fabric.  I would probably do the foundation piecing and machine quilting method, but I don't have a working printer at the moment.

Maybe I've bitten off way more than I can chew here?

I certainly have enough scraps to give this ago ... but then, this could be a chance to add Fossil Ferns to my stash ... Looks like I might need to pick a consistent background fabric to help tie it all together, too.  Or do you just use white like shirting fabric?  So many choices -- and the book isn't even here yet!

Monday, September 07, 2020

Scrap Buster Binding Tool Table Runner


I made 2 of these scrappy table runners this week. It uses leftover 2-1/2 inch black and white strips from this string quilt and this one.   These will be Christmas presents.    I may make a few more, they were relatively easy to make.  The hardest part was joining the binding beginning and ends.


Scrap Buster Binding Tool Table Runner tutorial by Jenny Doan of Missouri Star Quilts. 

What you need:

  • The Binding Tool
  • 8-1/2 inch block for center
  • 2-1/2 in strips cut to size with the binding tool
  • 8   2-1/2 inch blocks for cornerstones
  • Batting (about 1/2 yard to match backing)
  • 1/2 yard fabric for backing
  • 2-1/2 in strips for border
  • 2-1/2 inch strips for binding

I did it quilt-as-you-go, stitching through the top, batting, and backing at once.  I also used wool batting leftover from another quilt, so it has some extra loft to it.


Jordan Fabrics offers a similar tutorial for a Friendship Braid Table Runner, if you don't have the binding tool. 

Saturday, September 05, 2020

The Big Quilted Carry-all Tote Bag

The Big Quilted Carry-All Tote Bag

This was one of the first projects I did when I started quilting--even before I started this blog, which is why you haven't seen it here before.  Back in 2004,  I signed up for a class at the local tech school.  I was the youngest person there.  Although I'd been sewing most of my life, I was not familiar with quilting ways and means.   Most people in the class were retired ladies, committed to lifelong learning.   Most of them signed up perpetually and were always in the class. The tech school was getting some tremendous grants back then so that the retired set paid something like $5 for a class (per term) on a fixed income.  I paid the going rate, which was something like $55 per term, but I didn't mind because I was working full time, and could afford it easily.  It was still a bargain, and a nice way to spend a Saturday. 


Donna Tegan

Anyway, Donna Tegan was one of the wonderful instructors at the local tech school.  I thought it would be a more structured class with everyone working on the same project, but she helped you on whatever projects you brought--whatever we wanted to work on.  I started out with a 9-patch quilt kit my mom set me up with -- for a relative in Japan.  That came together fast and easy!  And I still had several classes left, so Donna suggested I make one of her giant quilted carry-alls.  It was her own pattern -- I know I have it filed away someplace, but I'm pretty sure it's not available online anywhere [Please don't ask me for it.].  The first thing I had to do was map out the pattern pieces.  She had sizes on paper, but no pattern pieces as I was used to from my former life as a dressmaker.  To make 1 bag, I had to make it multiple times for each layer: outer fabric, fusible pellon stabilizer, batting, muslin lining--in addition to the pattern pieces I made up.  Keep in mind, I was also learning to use rulers and rotary cutters back then.  Great exercise for that, too!

The idea is that you could put the makings of an entire quilt in this bag, and easily haul it to class.  Batting, quilt top, backing -- or even a finished quilt -- would easily fit in this bag, along with rulers, and cutting matts.  That said, it's very easy to overload it, too, by putting too much in it.


To give you an idea of how big it is: The bottom of the bag is held in shape by the empty cardboard from a bolt of fabric.  You cover it with multiple layers of batting and fabric, so you can use it as a portable ironing board when you are at quilting class. 

Rosita, me and Ma in 2010

I made 2 other bags after that, for the Quilt Ladies in my life at the time: 1 for my mom, and 1 for my Aunt Rosita. 


For Rosita's, I used a crazy quilt print.  She was the master embroidery lady.

Not sure what happened to that bag after she died?  I only have these 2 scraps left ...


For my mom's, she picked a winter berry pine fabric.  I had just a few scraps left of that, so I used it as the accent border on Holly's Christmas Quilt.


Wednesday, September 02, 2020

Scrap Management: Crumbs

This is my first "crumb" block.  


I pulled from the pile of scraps comparable to "bits of string too short to save." 

"It's good yet!  I can't throw that fabric away!"


I started with a foundation square that was about 4 inches.  I didn't want anything too big for this first experimental attempt.  In future, I might make it 4-1/2 or 5 inches to allow some room for trimming and squaring it up afterwards.

Then I just started laying bits of scraps on the foundation, and doing the sew and flip method until the whole block was covered.  No real rhyme or reason ...  Kind of like a crazy quilt block.


Here it is before trimming.  Unruly and unkempt.

But I can still tell you what projects I used those strips of green in, and that orange wave ...  

This could wind up being a kind of memory quilt, after all.


Here it is after trimming. 

And no-- I will NOT be keeping those even smaller crumbs, trimmed off the edges. 

I loved that orange wave scrap, but I never noticed the blue wave in it.  When it was a bigger chunk, I always saw the green, black and orange in it: Never the blue!

I'm thinking this might be a nice warm-up or finishing exercise -- or even something "mindless" that I can do in the evenings after work where I can enjoy colors and shapes and not think too much about numbers or words.