Monday, June 26, 2023

How to Get a 200# Loom Upstairs

Here she is in her own room upstairs, but I thought you might be interested in how she got there ...

When we went to pick it up, we had to rent a Uhaul van to get her home, because it's too big to fit in either of our cars.   It was about $100 ($20 plus mileage and other fees).  Not bad, really.  A neighbor helped get it onto the porch.

Floor Loom Weights  
Weights Are Approximate

Weaving Width
4 Shaft
8 Shaft
30" 150 lbs. 180 lbs.
36" 160 lbs. 190 lbs.
42" 170 lbs. 200 lbs.

Here are the specs from the Kessenich Looms website: 200 pounds!

Four Shaft looms are 46” front to back beam.
Eight Shaft looms are 51" front to back beam.
 
Widths on all 4 and 8 Shaft looms are 16” 
wider than the weaving width. 
Shelves add 10" in overall width.

Height on all 4 and 8 Shaft floor looms are:
40” high at the castle when open

60” high and 28” deep when folded.

Although it feels lighter than the 4-shaft loom.  I think it's the difference in the wood. This one is cherry; I think the other one might be red oak -- a heavier, denser wood.
 

This is worth posting, because I know people will wonder how in the world we moved that very large loom up our very narrow stairs and into its own room.


Here it is sitting on the porch in the folded / stowed position, awaiting it's trip upstairs. 


Here's the side view.

Kessenich Looms are brilliantly designed and solidly built! 


My husband and son helped get it upstairs.

We removed a few parts of the loom in effort to lighten the load going up the stairs.

We removed the 8 shafts, full of steel heddles, along with the beater bar.  That made quite a difference for the weight, and made it much more manageable.

The Challenge: These are the stairs -- steep and narrow.


The 3 of us took it step-by-step -- literally and got it up the steep and narrow stairs, until we could rest 2 feet on the lip of the landing, just under the railing.


 This is the view from below ...

Then my husband slipped in a board that spanned the entire stair well opening.  And we were able to rest the other 2 feet on that makeshift "landing" board.    That gave us a breather to rest for the nest stage ...


Here's the view from upstairs, with the loom sort of "suspended" exactly where you would not expect such a heavy piece of equipment! 


Here's the view from the landing upstairs, with the loom resting 2 feet on the landing under the railing, and 2 feet on the temporary plank.  There is a "moving" blanket covering the railing in preparation for the next step.


For the next step, we flipped the loom over the railing, because it was too big to go around the corner at the top of the steps.  [There's a back breaker from the roof there, and the landing is just too narrow.] 

In this photo, it is up-side-down.  You can see the treadles on top where they would not normally be. 

 Here's a better look at the support board spanning the length of the stairwell, parallel to the railing, and the upside-down loom on the landing.  That simple board made this operation possible!

 
 Here's another view of the folded position.  It spent the night in our bedroom because we still had to finish painting the loom room before her arrival.

Here, my husband is re-attaching the beater bar, which we removed for the transport.
 
 
The 8 shafts are still sitting against the wall.  Removing these also made it much easier to and lighter to move upstairs.  These are still out-of-place until I do a little re-habbing on the new loom. 

Voi la!

Whoah be to anyone who has to move it back down someday!

Sunday, June 25, 2023

Welcome to the Family, Baba Mary Meigs: A Vintage 8-Shaft Kessenich Loom

The new arrival is a beautiful 8-shaft cherry wood Kessenich floor loom! 

Was that your guess?  It could have been a long-arm quilting machine, too.  That's what I always sort of planned on doing with this room when Oliver left home, but given the chance, I took a different path.  And here we are ...

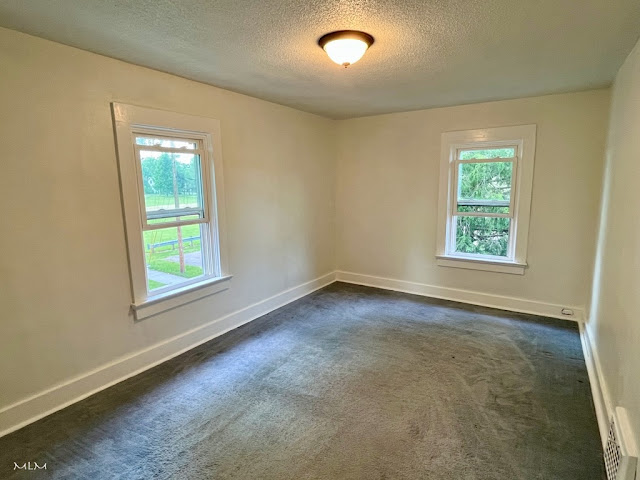
I made arrangements to purchase an 8-shaft (I have 4 now) Kessenich floor loom that has about 12 more inches for a weaving width -- which means I can do wider projects with more complicated weaving patterns.  A lady in Red Granite west of Oshkosh was selling one for $700.  That's an excellent price! And one that I could not pass up.  Oliver's room is a vacuum that demands filling!  A new ceiling light - touch up the walls where OKL whapped holes in the plaster (What the heck was he doing?)   Maybe even a new coat of paint now that there's room to breathe in there.   

The Mountain Cucumber Coverlet project has been such a positive challenge for me in making me think bigger and strategically about weaving -- pushing the limits of what I can do on a 4-shaft loom.  It will take about a year to finish all 4 panels of that coverlet on the 4-shaft loom ...  It will be nice to have a 2nd loom set up with other projects like towels or even something as simple as rugs.   I have a few kits I purchased and haven't worked up yet because I needed to convert it to the narrower weaving width I have on the 4-shaft.  This way I'll be able to do those kits without recalculations.  And no one says I have to use all 8 shafts every time.  This is a whole new stage of development for me as a weaver -- on to my PhD in weaving! 

Weaving Corollary 1: When the student is ready, the teacher appears. 
Weaving Corollary 2: The Loom chooses the weaver.

I see Kessenich looms occasionally on FB Marketplace or for sale in the weaving groups, but it's usually another 4-shaft, or they are too far away to practically purchase and transport.  This one is in my back yard!  And the price is fantastic for an 8-shaft loom.  New, it would be $4,250 to purchase one -- That's not including shipping.  This one is vintage -- Prob. older than me, built in Wauwatosa when they were in the Milwaukee area. (They are in Michigan now.)  They are built so solidly that anything wrong with them can be fixed. They are work horses, and I'm already familiar with the basic set-up on a Kessenich, so there's that much I won't have to re-learn on a different model/brand loom.  I'm pretty sure we'll have to hire some movers with a truck to get it here and get it upstairs. That's ok.  

I purchased an area rug to go under her, and welcome her to the space.  I hope she's happy here!  I'll have to give her a name ... but that will come as we get to know each other.

The specifics: 
  • 8 shafts; 10 treadles.
  • 54 inches wide, with a 42-inch weaving width.  
  • 46 inches deep when set up
  • Beautiful warm cherry wood, with a closed grain (My favorite wood!) 
  • Weighs about 200 pounds
 
These looms fold up for storage and transport.  But are very heavy.  We had to rent a Uhaul van to go and get it -- Too big to fit in either of our cars.  It cost about $100 to rent the van for the afternoon, including 69 cents per mile.  Not bad, really.  

Mary Maegs Atwater's Recipe Book: Patterns for Handweavers

I have to give her a name ...  What should I call her?  Meigs, I think!  
The lady I got her from also sold me a Mary Meigs Atwater Recipe Book to go along with it.  Meigs -- similar to Maggie, but not to be confused with my beloved 2nd-chance Newfie.  Meigs -- a variant on Magestic.  She is elegant, but not overdone.

Squee!  I'm so excited!  We will be partners in this new adventure!
No plans to buy an RV or a hot tub in retirement. 
But weaving looms: YES, please!
 
Next step -- She needs a few small repairs ...

Saturday, June 24, 2023

Preparations for a New Arrival ...


A fresh coat of paint and a new ceiling light.
 
The paint color is called Linen.  It's a creamy white.  The trim is a high gloss left over from doing the living / dining room a few years ago -- That color is called Golf Ball. 
 
This photo gives you an idea of what it was before ...  Eeesh!

My kid moved out in May to start his professional life as a Microbiologist in another city, leaving a vacuum in his old room ...

So I washed the walls and painted the room.  My husband helped with the base boards and the ceiling.  Amazing what a new coat of paint will do to lighten and brighten!  [Funny that it's much easier to do things like paint when the kid no longer lives here.  Does he really take up that much space, time, and attention?]

A new area rug, picked up on FB Marketplace.  Kinda fun to have these little local adventures to pick up these treasures every weekend -- Like cheap date night!

A vintage piano bench ...  needed some fortifications before my wide bottom starts using it.  

Good thing my husband was up to the task of re-gluing all the joints and adding some corner brackets:


A stool  purchased at Target. For some reason, it was too hard and complicated to get just 1 of these stools on Marketplace.  This was not hard to assemble, and it seems very sturdy.


And for lighting:

  • a new overhead light - This one is already installed, and is a great improvement over what was there before.
  • And for task lighting, a 3-headed floor lamp -- I bought one at Target (See photo above) that seems to be working well for my needs.

A narrow library cart for a side table / work bench.  It's on wheels so easily moved out of the way when I need to tinker with the object of my affection. [Deb K: Does this look familiar? ;-) ]

A bookshelf (not pictured yet).

A quilt-hanging wrack for displaying coverlets!  There will also be a curtain rod / Quilt Display Bar up above for  inspiration and/or design wall.


Small Desk that had been on the porch for years.  I was using it back when I was making a lot of surface design textures.

Any ideas as to what the centerpiece of these preparations will be? 

Stay tuned ...

Friday, June 16, 2023

Ink Samples: Iron Suphate Ink with Black Tea (for Tannin)


I made this ink back in 2015, and it's still works beautifully!
The black tea adds tannin that helps make the ink. 

I was trying to find the Sweet Leaf post describing how I made this ink, but I'm not finding any such post.  Is it possible that I never did write this one previously?

I bought the Iron Sulphate (Copperas aka iron vitriol) at the same time I bought the California Oak Galls from JBB Pens & Paper on etsy.

Here's a sample with iron sulphate ink with silver watercolor, 

although the photo doesn't do it justice.

This would also look nice with the copper oxide ink to give it a nice green patina ...

Thursday, June 15, 2023

Iron Gall Ink: "None-More-Black" Samples


I made this Iron Gall Ink back in 2014, and it still works / writes beautifully!

I remember being surprised a just how black it became after a few minutes set to paper.  That gave it enough time to oxidize and turn "none-more-black."


Very easy to write with.

If you had this recipe, and a good stock of it, you wouldn't need anything else, would you?


It mixed nicely with the copper watercolor. 


Wednesday, June 14, 2023

Walnut Ink Samples


Walnut Ink with Copper Watercolor.


Back in 2011, I made a BIG batch of walnut ink.  A lifetime supply!

There are several trees in the neighborhood, so it was easy to forage the walnuts.

It has aged very well!  I remember when I made it, it had a distinct compost-y smell.  It's much more pleasant to be around now -- esp. with that bit of clove as preservative. 

Very easy to write with the new feather pen.


I experimented with the preservative: rubbing alcohol vs. vodka.
I also experimented with papers ...
On the catalog cards, it feathered and ran, where it seemed to behave better on the watercolor paper. 

It showed a similar feathering effect on the catalog card.


Tuesday, June 13, 2023

Making Ink: Coffee Bean Ink - Folgers Decaf


Coffee Ink (Folger's Decaf)

What can I say?  We are not coffee people at my house. We drink tea.  The Folgers instant coffee (decaf) was leftover from years ago when my Dad came for Thanksgiving ...  Since it is what I had on hand, I wanted to give it a try ...  wondering if the decaf. and dissolving processes would impact the quality of the ink? [It also makes me wonder how to make water-soluble walnut ink crystals?  but I digress ...]  I think I was also using this to age paper and create textures that way years ago ...


 Coffee Bean Ink

from Jason Logan [The Make Ink Guy]'s workshop handout.

Coffee Beans make a great ink pigment.  Grind the coffee beans, or use dark espresso powder, and you have your pigment!

  • 1/2 cup ground coffee
  • 4 cups water
  • 1 tsp vinegar
  • 1 tsp salt

Put the coffee and water in a pot and simmer on low for 1 hour.  Remove from heat and allow to steep overnight.  This step is not necessary, but the longer it steeps, the darker your ink will be.  

Strain the ink through a fine-screened sieve and return to the stove. 

Simmer the ink on low until it reaches the desired consistency and color. Add the vinegar and salt to lock the color in.  You should have about 1 cup of ink when you're done.  Store in a small glass jar with a lid, such as a baby food jar.

Coffee Ink (Folger's Decaf)


 Samples of Coffee Ink


Samples of Coffee Ink with copper watercolor.

Coffee Ink on a library catalog card.

Sunday, June 11, 2023

Making Ink: Rooibos Tea Ink


Rooibos Tea Ink Recipe
from Jason Logan [The Make Ink Guy]'s workshop handout.
 
1 tsp loose Rooibos Tea (or 1 teabag)
1 Tablespoon of boiling water
Steep for 20 minutes.


Filter the tea and add a pinch of baking soda (sodium bicarbonate) and boil the tea for a few minutes. 

This is the tea when I first put it on to boil.  I had just added the baking soda ...
 

 Here it is after simmering for 3-4 minutes.  The color is darker as it reduced in the pan, as would be expected.  Not sure if the baking soda deepened / changed the color or not?

 The residue left in the pan.

To thicken it, add a bit of powdered gum arabic.  
To preserve this ink, add 1/2 tsp vinegar and a pinch of salt.


This amount fit nicely in a Penzy's spice jar.  Could have made a double batch!
 
It's a different red than the avocado ink from a few weeks ago.  

I bought a fancy feather pen that makes it much easier to write with these inks.
The crappy old calligraphy set I had was not ideal.
 

Rooibos Tea Ink on an old Library catalog card.
That's what I have on hand -- My day job is a Medical Librarian.  We just don't use these old catalog cards anymore, so now they've taken on a new life in mixed media!