Sunday, April 30, 2023

4 Seasons Wall Hanging from Laura

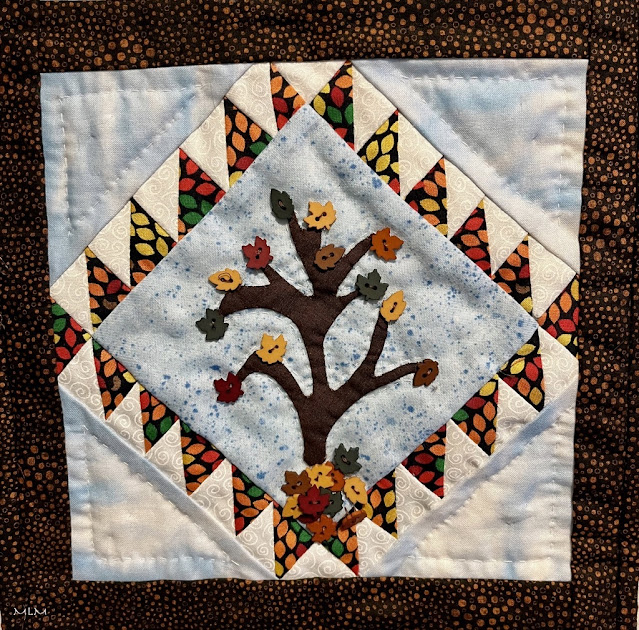
My dear friend Laura gave me this little 4-seasons quilted wall hanging. 

A while back, Laura picked it up as one of the kits I gave away from my mom's stash.  When I gave that stuff away, I never expected to get any of it back -- There was never any expectation about that.  I just wanted to get it into the hands of quilters who would finish them and enjoy them and give them away.  As she was working on it, Laura said my mom told her to give it to me.  That hit me like a ton of bricks!  I've been feeling like I lost my mom lately [Complicated grief because she was sick for so long before she died] -- not just because she's dead and gone for a few years already, but because I haven't been able to find her to talk with her on the unseen forces network.  I lost the frequency, so the week before, I told her I couldn't hear her anymore, and asked her to send me a sign ...  She could hear me, and she went to work in the background and found Laura.  I got the message.  Wow -- Just Wow!

Thank you, Laura. 


Thank you, Ma. 


Thank you, Universe.


So -- a gift from my mom, from beyond the grave.  Not only that -- I now have some of Laura's lovely hand-quilted work too.  Something I don't do in my own quilting, so I am overjoyed to have it!

We're all just walking each other home, right?

Monday, April 17, 2023

Making Ink: Avocado Pit Ink


Prussian Blue and Avocado Pitt Inks on watercolor paper.


Wondering how to make Avocado Pitt Ink? 

It was much easier than I thought it would be!

With a nod to Jason Logan, The "Make Ink Guy" in Toronto, the recipe comes from a handout he provided for one of his workshops.  I also have his book -- which I highly recommend!


2 large Avocado Pits simmering for 20 minutes in  1 cup water plus 1 tsp soda ash (same as for Procion dye jobs).
 
I never expected such rich color from something so unassuming as avocado pits!

Spent Avocado Pits strained from the ink.
 
They look like beats! 
Residue left in the pan.
 
Avocado Pit Ink
 
 
Prussian Blue (left) and Avocado Pit Ink (right)
 
Empty Penzy spice jars are perfect for inks!I added 1/2 tsp gum arabic as a binder 
and 3 drops thyme oil for preservative.


  Ink blots on a clean library catalog card.
 
An interesting initial test, but it's calling out for a little sparkle on the edges.
Maybe some copper?
 
 Avocado mixed with Prussian Blue.

Sunday, April 16, 2023

Making Ink: Color Extractions - Prussian Blue

About 10 years ago, I was fascinated with the idea of making my own ink.  We have several black walnut trees in the neighborhood, so walnut ink was an obvious choice -- I now have a lifetime supply!  I was also interested in making textures, so the possibilities were endless ...  Recently, I stumbled upon a new book called:


Make Ink: A Forager's Guide to Natural Inkmaking by Jason Logan.

He read the same book on Color: A Natural History of the Pallette by Victoria Finlay.   I remember appreciating the stories behind each color, and her world travels to track down those stories, but Logan made me realize that color is all around me -- I don't have to go on great adventures; I can find sources of color right in my back yard.

From peach pits and avocado pits, to beets to buckthorn, grape juice and lumps of coal, or even crumbling gypsum drywall, ink sources are all around us!  

With the renewed interest in making color, I've been assembling the items needed to make ink, many of which I already had in my stash:
  • jars (spice jars from Penzys, or jam jars)
  • thyme oil (for preservation)
  • wintergreen oil (for preservation)
  • cloves (for preservation)
  • rubbing alcohol (for preservation)
  • Vodka (for preservation)
  • gum arabic
  • paper
  • eye shadow for a little sparkle
  • liquid metallic watercolors (more sparkle)


I had to purchase a mortar and pestle, as I didn't want to get a food grade one sooty with lampblack. This one is made of iron, and quite heavy.  I should be able to crush anything from salt to stones!

I had a glass pen from years ago, because most of the ink I can make, I would not trust it in a fancy / expensive fountain pen.  Also had the calligraphy pens from years ago ...

I've been trying to make blue ink for a while now ...  but I'll leave that for a future post!

Did you know there are multiple ways to make black ink?  Years ago, I used oak galls and iron sulfide with good success.

For today, Prussian Blue Ink!  Sky Blue!

This week, I made some Prussian Blue Ink out of Mrs. Stewart's Laundry Bluing and water (Yes'--that's it!)  I had wanted to try this during the pandemic, but bluing was not available anywhere at any price.  I'm glad it's back in stock!

I added a little gum arabic to thicken it up a little.


Here are 2 inks I made this weekend: Prussian Blue (on the left) and Avocado Pit Ink (right).

And of course, what to do with said inks?  

Abstract Textures ... on paper!  These were all made by dripping some ink on a teflon sheet and then pressing paper down onto the splatter.

In this case, the paper is a blank library card.  It's a lovely blue, but it needs a little sparkle ... 

Perhaps a drop of liquid metallic watercolors?   Or some eye shadow scraped into the jar? 

 I'll save that for another day ...

This one is on watercolor paper.

Monday, April 10, 2023

Getting Ready to Weave Again: The Odyssey Coverlet Project (aka Mountain Cucumber): Part 3 - Test Blocks

It's working!

I LOVE this pattern! There is so much going on in it!

Practice block / Test / Dress Rehearsal for the Mountain Cucumber Coverlet Pattern


Testing and Experimenting - Starting to weave

I calculated some extra warp for testing and experimenting.  I need to figure out 

  1.  What shuttles to use
  2.  What threads for tabby
  3.  How much space a block will take, so I can make sure I'm consistent -- The 4 panels need to match up when I sew them together.


Beginning to weave - Test Block

For the initial test, I used the 10/2 cotton yarn, same size as the warp strings.  Although it's a relatively fine string, it seemed to weave a courser cloth than I expected.  The blue pattern threads should be closer together so they read as color blocks.  That can be fixed by using the finer 20/2 cotton thread for tabby, and by beating a little harder.   

With overshot, the pattern thread is supposed to be 2x as thick as the warp and tabby threads.  One of the coverlet references I consulted in designing and making this coverlet said to use a tabby that was half the size of the warp strings.  Other overshots I've done used the same size tabby as warp strings.  So for the first part of the test block, I used the same size tabby.  So I wanted to test and see which one would work best.  I'm glad I did the test!

This Mountain Cucumber/ Governor's Garden pattern makes it relatively easy to see what you're doing, and if you missed a line, or added an extra one.  That said, if I use the same size tabby as the warp strings, it spread things out too much. In the photo above, you can see the pattern threads are too far apart, and don't group together enough to create a solid block of color.  They read more as half-tones. Another way to manage that might have been to double up the yarns by using 2 strands of blue for the pattern threads.


By the time I started weaving the circle design above, I had already switched to the finer tabby thread, but it wasn't quite enough to condense this circle to make it round.  You can see the lower half of the circle is stretched out and elongated.  I realized that I needed to beat harder to make the circles rounder.  That's why the top half of the circle is a little denser.  I'm realizing that I don't have to baby this cotton thread, even if it is thinner.  It's American Maid Cotton, coated with a beeswax finish that will wash out later.

I am getting a feel for what I need to do -- and how hard to beat to get the desired effect. 

Circles vs. Tables 

This photo is from the end of the pattern repeat - towards the end of my practice piece.   By then, I was beating a little harder, and the circles are rounder than the first try, but still kind of elongated.  I'll have to do a bit more experimenting to see how many lines per inch to be consistent.


See those worms and cucumbers!  Those look just about exactly as I expected they would!  There is so much movement in this pattern -- That's what made me fall in love with this pattern.

The other option is to use the thinner 20/2 cotton for the tabby.  Yes-- this seems to be giving me the look I was after.  It allows the blue pattern thread to bunch up better and read as a color block, instead of half tones.

This will definitely be a lighter weight coverlet -- for summer.  I'd have to use much heavier yarns for a winter coverlet.  Although, things will plump up a bit once it's wet-finished and whatever sizing is washed out.

Some things I need to remember while working on this project:

It has floating selvedges on both edges.  I added a sturdy fishing line to give it strength and makes it less likely to bow in.  The fishing line will be pulled out once it's off the loom.

For the floating selvedges, I need to remember:  Over the selvedge going into the shed; Under the selvedge coming out of the shed.  Over / In ; Under / Out.


I still need to order some fabric tape measures so I can track how far I've gone with each panel, and to make sure I'm staying consistent with beating so that the panels match up properly when they are off the loom.  I think that may be the biggest challenge with this project.  I thought about making my own out of ribbon, but decided the purchased tape measures would be more consistent -- esp. since I need all the panels to match.

Sunday, April 09, 2023

Getting Ready to Weave Again: The Odyssey Coverlet Project (aka Mountain Cucumber): Part 1

Warping in progress from a few weeks ago.  That's nearly 600 warp strings sleyed through the reed and heddles, and ready to be wound onto the back beam.

After several months of planning and several weeks of preparations for this Mountain Cucumber / Governor's Garden coverlet project, the loom is warped and nearly ready to weave again!  Last weekend as I was winding on the warp, no less than 10 strings popped and broke under the stress.  Maybe I had some crossed threads in that section?  I guess that's not bad with 600 strings!  It took a good part of a day to repair those 10 broken strings.  Dealing with a 15-yard warp requires some extra fussing not necessary in a shorter warp.  Although I ran extra warp strings for repairs, it turns out they are difficult to manage being so long.  I was having a hard time pulling 1 string for repairs without it tangling.  I found it was easier to run the repair stings individually 5 yards at a time, and wind them onto a pill bottle to keep it from tangling.  Repairs are done now!


Pill bottles on the back have loose change in them to weight down the repair warp strings.  The pop tops keep the strings from unwinding.

Also tied up the treadles this weekend.  That part was relatively easy!

The next step was to set up the treadle beads.  This pattern requires about 300 treadling changes per 1 pattern repeat.  With so many steps, I needed additional rows to hold the treadle beads.  Look for a separate post on that topic.

________________

I've been referring to this epic coverlet project as The Odyssey, because it's a huge undertaking, and will take a while for me to finish it.  And I'm learning a lot as I go.   Other than rugs, this may be the first time I'm not following a kit or set pattern, so I've had to draw on 10+ years of weaving to move ahead ...


Repair Heddles hanging off the back of the loom.  

Angel Wings (those wooden dowels that separate the threads) allow for more even tension while winding on.

PHOTO REPAIR HEDDLE

There was just 1 heddle I needed to re-thread.  In the plain weave test, I could see that I'd missed one -- Actually, I'd put it through a heddle on shaft 4, when it should have been shaft 3.  Easy enough to fix!  I made a temporary string heddle in the right place on shaft 3; pulled the respective warp thread, re-threaded it through the new repair heddle and tied it back onto the front beam.  Voi la! Back in business!

It feels sooo good to be weaving again!  It makes the planning and set-up all worth the time and effort to get to the fun part.  It is magic to see the pattern emerge on the cloth!


Testing and Experimenting - Starting to weave

I calculated some extra warp for testing and experimenting.  I need to figure out 

  1.  What shuttles to use
  2.  What threads for tabby
  3.  How much space a block will take, so I can make sure I'm consistent -- The 4 panels need to match up when I sew them together.

For the initial test, I used the 10/2 cotton yarn, same as the warp strings.  Although it's a relatively fine string, it seemed to weave a not so fine cloth.  The blue pattern threads should be closer together so they read as color blocks.  That can be fixed by using the finer 20/2 cotton thread for tabby, and by beating a little harder. 


Shuttles

Although I love the Schacht kayak shuttles, they were too light for this project.  I needed something with more weight and heft to press down the threads in the shed--They were a little sticky when I started weaving.  he 1980s shuttle  also was not ideal -- the wire requires a pair of pliers to remove and change a bobbin, which is too much fuss and bother.  The obvious choice for the blue pattern thread was the maple Hockett shuttle.  It has good weight for this project (The similar sized Bubinga shuttle in the same shape is too heavy).  The Hockett shuttle has a nice wide flat base that slides over the threads.  And I can wind quite a bit of yarn on the bobbins.

For the tabby shuttle, I tried using my lovely little commissioned apple wood shuttle.  It has a nice weight and width, but it was too short and it was hard to throw all the way across the width of this fabric.   Again, my beloved Schacht shuttles were too light for this application. 

Shuttle Winners for this project: 

Jim Hocket Birds Eye Maple Shuttle (top)

Jim Hockett Bubinga Double Bobbin Shuttle (bottom)

So I opted for the double-bobbin Bubinga Hockett shuttle, even though I will only be using 1 bobbin at a time.  The advantage of this shuttle is that it's about the same length as the larger maple Hockett shuttle I'm using for the blue pattern thread, which makes it easier to throw through the shed without it getting stuck in the middle.  And it's a little narrower, which is a nice mental note because it carries the thinner tabby thread.

To be continued ...