Saturday, December 30, 2017

Avalanche Alpaca Hat Finished

 
Detail of the crocheted cables and popcorn stitches.

I started this hat a few months ago with a few rounds a week.  Some new stitches for me, or rather simple variations on the basics of single crochet and double crochet.  Reading the pattern was a little bit of a challenge, but I worked though it, and it does look something like the photo on the pattern.

The pattern is from Crochet Garden on Etsy  : Rugged Mountain Hat Collection for Men.


I spun the yarn last year from a bag of alpaca roving from Sabamba Alpaca Farm.  Really nice stuff! It' is unbelievably soft and warm.  It's dense, too.  Tested at -11 degrees F.

 What immense satisfaction to know that I could create this straight from the alpaca fiber to yarn to making a practical and useful item!

DH says he wants one, too.  I told him it would take a while to spin the yarn from roving again ... He's willing to wait for it.

Toasty and warm!

Friday, December 29, 2017

Mending


 My favorite pair of alpaca mittens -- warm and black.  They have tremendous sentimental value for me, as they remind me of my old (now gone) Newfie, Maggie.    Unfortunately, they are wearing out.


 Mending is not my favorite pass-time.  But there are times when it has to be done.  My 2 favorite pair of winter woolen mittens both had holes in them that made them less than efficient at keeping up the winter cold.  I've mended them before, just pulling together the open edges with thread, but that was leaving less and less fabric on the thumbs -- ie no room left for my thumb!


 Not pretty, but they will hold together for a few more months.

The palms and the thumbs always seem to wear through ...
 

Once I sat down to do it, it wasn't so bad.  Just think of the darning as a form of "spot weaving" and it doesn't really take as long as you think it will.

Mending has the taint of drudge work to it.  Thankless way to spend time, when you could just toss them, and buy new.  Well -- not with these mittens.  I buy a new pair of woollen mittens every year, but it;s not every year that they actually fit well, or are warm, or that I really wind up loving them.  I love these 2 pair of mittens enough to spend the time to mend them.

In truth, there is a tremendous amount of creativity that goes into repairing things like this.  I contemplated several ways to approach the repairs.  Even purchased some leather to use as patches, but then couldn't figure out how to hand-sew through the leather.  I also considered taking them apart and replacing the pieces that were wearing through -- but I didn't want to take the time to de-construct and re-build 2 pairs of mittens that way.   In the end, I settled on the most basic approach -- darning with wool yarn,weaving new fabric with the old.

 Good as new -- sort of.  This will get me through the winter.

New Tie-Up Chains on the Loom


Soon after I acquired my Kessenich Floor Loom, some of the tie-ups for the treadles gave way -- rusty clips, and tired rope.


We replaced them with a heavier and sturdier window sash chain and ...


... these S-Biner clips.

All together now ... new clips and new sash chain.
Should be good for another 100 years!

Thursday, December 28, 2017

Color Gamp is off the loom


It's a big deal to take a project off the loom.  This color gamp has been done for a few months now, but I've been reluctant to do the next steps just because I wasn't sure how long it would be before a new project got warped and ready to go ...

There it was -- the moment of truth ...  cutting it off the loom, and opening it to see a double layer of fabric -- open and true, not stuck together in any place.  

This was a kit from The Yarn Barn in Kansas - Shetland Wool Color Gamp.  I turned it into a double weave just because the working weaving width of my loom is only 30 inches (or so).

There are few things to repair and correct -- a few warp strings popped and broke along the way.  I was getting good at repairing them as they happened, but some on the bottom layer were harder to see and fix. 

Then there's the wet-finishing.

I was also interested in seeing how the colors worked with or against each other in the warp and weft.  It was a worthwhile project as a color study.

 Here is is fresh off the loom.  Like magic, you open it, and the fabric opens and it's twice as wide.  Wow!  It worked!

The 2nd half looks much nicer than the first half.  By then I had figured out how to repair broken warp strings, and the tensioning, and beating.

The first half needs a few small repairs where warp strings broke on the underside, and I didn't realize it until too late ...   Once I get those repairs done, I'll be able to hem the ends, and then do the wet finishing. 

 Here are some of the sample color blocks.  Again, it's a color ctudy, so you can see how each color interacts with the warp and weft in all the other colors.  Pretty neat.


 Here's the fold.  I'm hoping this settles down with the wet-finishing.  


After a few minor repairs where I had to re-thread some broken warp strings, and hemming the ends, I was ready to do the wet-finishing.  It softened up nicely.


Very interesting to see how the colors interact and "play" together, or not.

Sunday, December 17, 2017

"Sing a Sleying Song Tonight!"


Feels good to have a new project on the floor loom.  Did the slaying (pulling the ends through the reed) this morning.  Only 156 ends, so it didn't take long.  ;-)

In the Christmas season, "slaying" (not sleighing) takes on special meaning for someone who weaves.  I'm sure someone has done a weaver's version of Jingle Bells.

This was a kit from the Yarn Barn of Kansas.  I worked up the warp Saturday morning -- It didn't take long with only 156 ends at 3.5 yards.  My friend Lynda came in the afternoon to help warp the loom.  It didn't take long to thread the heddles either, with so many fewer ends.

 So much order from previous chaos.  I love this part of warping the loom - not so much the threading--unless my friend Lynda comes over to help.    Then it's a social thing.

This part also makes me thing of stringed instruments -- harps or pianos -- Like I should be able to play music on this "instrument."

 The yarn is a bulky core spun alpaca from The Yarn Barn of Kansas.  Very soft.  Looks almost like roving, but it does hold itself together.  Oatmeal, Heather Gray, and Cream colors.

It's so thick, I was worried we might not be able to use my standard steel heddles, but I think they'll work just fine. 

 I loaded up one of my ski shuttles in preparation for weaving. 

The loom is set up as a double weave (again) just like my last project (the color gamp), so I don't even need to change my beads to help me keep track of the "lines," or the the shuttle takes through the shed and what treadles I need to work at any given place in the pattern.  


Here's the pattern from the kit purchased through The Yarn Barn of Kansas.

I expect this to weave up very quickly.  Soon I'll have a lovely warm winter blanket to snuggle down with!

Saturday, November 25, 2017

Progress on the Polar Bear


Made some great progress on the Polar bear wall hanging at Quilt Camp this past weekend.


I worked up the background with 2 pieces of crushed velvet that have been waiting for this very moment in time!

The one said Northern Lights to me as soon as I saw it.

The other one was from a bolt of of crushed velvet that I had planned to make a dress out of --  in a previous lifetime, before I started quilting.  Those days are long gone!

This came as a kit from Quilting to Pieces Quilt Company in Appleton, WI.  They used a pattern by XXX, modifying it from a strange lavender Holly Bear to a much more agreeable Aurora Borealis Bear with stars in the sky.   I took it a few steps further with the velvet backgrounds and the crazy quilting stitches to applique the bear down. 

I did use the whites and creams in the kit to make the bear, but then I crazy-quilted all the seams down with different stitches.   I was also considering using scraps and laces from my own stash to make the bear out of linens and wools (left over from my wedding dress), but I didn't quite get around to that ...  Maybe another round?

I also trapuntoed the bear to make it pop out more -- more of a 3-D effect.  The bear is stitched to a piece of black fabric, then he has an additional layer of batting (actually -- recycled from a nice thick and puffy mattress pad).

I got so far as appliqueing the bear to the background, adding the borders, and sandwiching the batting and backing.  I did use the batting layer as a stabilizer for the velvet.  So the velvet is quilted to the batting before the bear was added on top.  I still need to go through all 3 layers now to finish quilting it properly.  Then the binding, label, and hanging pocket for the final finish.  The end is in sight!


Stumbled across this picture on Pinterest, but the source was gone.  If I knew where it came from, I would certainly give credit.


Mande's Orange Star Quilt Top is Complete


I actually finished this top BEFORE I left for Quilt Camp last week.  I was afraid the pieces would get mixed up and out-of-order if I dismantled it and took it down to transport it to Quilt Camp.  I just knew the blocks would get out of order, and it would be a disaster waiting to happen.

It's been a remarkably difficult quilt top to photograph, as the colors don't usually show true to life.  This is as close as I've seen it (minus the flecks of sunlight on the lower left quadrant). 

This way, I had something for show-and-share. And I could hand it off to my mom so she could do her share ... which is to get a backing, and get it quilted.  I'll probably wind up doing the binding before next summer.

We'll plan on having it done by next August when my sister comes for her annual visit from Japan.   Then we don't have to spend $150 (or more) just to mail it to her.  Postage is crazy to Japan!

Monday, November 13, 2017

2 Iron Caddies


At Quilt Camp in October, I decided I needed a decent iron caddy with pressing mat.  Until now,  I've been swaddling my iron in an old scrap of batting.  It looked so forlorn and ragged with that humble wrapping.  Laura had a nice iron caddy tote that opened into a decent and portable pressing mat.   It looked simple to make, so I searched the Internet and found a pattern from TriCounty Quilters.

I had just about everything needed.  All I needed to purchase was Insulbrite and the silver iron fabric.  I had fabric, and warm-n-natural in my stash already.


 Top view with an iron inside it.

This is how it opens up.
You can also see the stitching lines, which also serve as the folding lines.


Then I showed my mom, and of course she wanted one, so I made one for her, too.  Holly fabrics.  [Shhh! don't tell her -- It's one of her Christmas presents.]   If my Auntie Rosita were still around and quilting, I'd have made one for her, too. 

Sunday, November 12, 2017

Setting the Twist


An important step in spinning your own yarn is to set-the-twist.  Basically, you skein your newly plied yarn, secure it, then give it a 10-minute bath, and hang it up to drip dry. It allows the yarn to "bloom" (if it's wool) and relax into the new positions.  In other words, the twists start to sort of "hug" each other.


Step 1) Used my DIY skein-winder to change the format from ball to hank.
The skein-winder works great!  [Turns out having the expandable mug rack is a plus because it's adjustable, allowing for different skein sizes.  *]

Step 2) Secure the strands to prevent tangles.  I used a bit of kitchen twine because that was ths closest thing at hand.  It helps to use something that is a contrasting color as it makes it easy to differentiate when it comes time to cut those ties off.

Here is the newly skeined yarn, hanging up and awaiting it's bath.  Compare this to the yarn at the top of this post.  There's quite a bit of variation -- thick and thin.  Just wait ...


Step 3)  Give it a 10-minute bath (add a little wool wash) to open the fibers and allow them to relax. Repeat until the water runs clear. 

Here is where my friend Lynda would caution me NOT to use water that is too hot, as it could felt the fibers together, and that's not what I'm after here.  Make it warm enough that you can put your hand in it--like bathwater.  You don't want to "shock" the fibers.


I was surprised at how much brown stuff came out in the water.  The roving seemed very clean as I was spinning it -- even after it was balled and skeined ... so I gave it second round in a clean batch of water.   Ah--much better!

Step 4) Squeeze out as much water as possible without wringing the fibers.  You don't want to felt them together at this stage.


Step 5) Wrap the wet skeins in a towel, and try to pull out more water that way ...

Looking a little bedraggled at this point ... but stay with it to the end ...


Step 6) Hang them up to drip dry.  You can add weight if you want to tamp down the springiness (as for weaving) or let it stay springy if you're going to knit or crochet with it where that added energy is an asset.

This time of year (November) and in my house, it took several days for the skeins to completely dry.  Each day, they plumped up a bit more, got nice and fuzzy, and gained a nice luster.


Step 7) Back on the skein-winder ... to process back into balls/cakes again.

This Sabamba alpaca yarn is so soft -- a real luxury to work with it!  After it was dry, the yarn had visibly "plumped up" and was thicker than before the water treatment.  I was glad that the DIY skein winder adjusts to different sized skeins.  I needed a different setting AFTER the water bath treatment than before.  Compare this one to the one at the top of this post. 


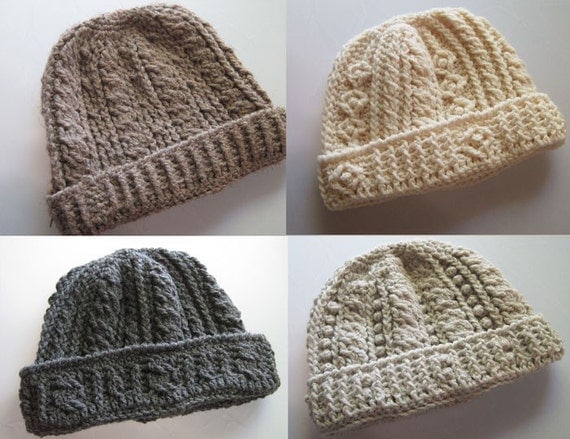
Ready for my next project ...  which I think will be one of these hats--crocheted :


Or maybe I'll actually learn to knit (after all these years!).  I just signed up for a beginning knitting class at Craftsy.  It would give me so many more options for making stuff -- especially those little Bob Cratchet fingerless gloves.  I had a really beautiful (and pricey) pair that I loved and misplaced.  So I'm motivated to learn how to make them myself now.

I learned to set-the-twist 20 years ago at a class I took in Madison, WI, when I first learned to spin yarn at the Weaving Workshop.

If you want to know more, I found a good explanation/tutorial at Craftsy : How to Finish Hand Spun Yarn.