Sunday, January 30, 2022

Planning a Diamond Twill


Up Next: Diamond Twill.  These are samples from a Scandinavian supplier (no longer available).

The spa towels are weaving up fast!  I am half-way through the 3rd towel.  I will probably finish the weaving on ti next weekend.  Then it's the finish work: hemming, splicing, wet-finishing.  I can't wait to see what it looks like after it's washed and fulled.

So the next project:  Recovering my Loom Stool with a Diamond Twill.

I searched through my stash looking for a piece of tapestry fabric that has been with me for a very long time -- at least since the 1990s.  Blue and green diamond twill that I was saving to make a vest or bodice for SCA period dresses.  A few months ago, I must have purged it in effort to make more room for other things.  And of course, as soon as it's gone is when I find a use for it ...    

I am old enough that I have and remember things that are no longer available in commerce.  Since I no longer had it, I was hoping it might be available for purchase, but the only thing remotely like it and made of natural fibers (NOT polyester) ...  I found something that might work ...

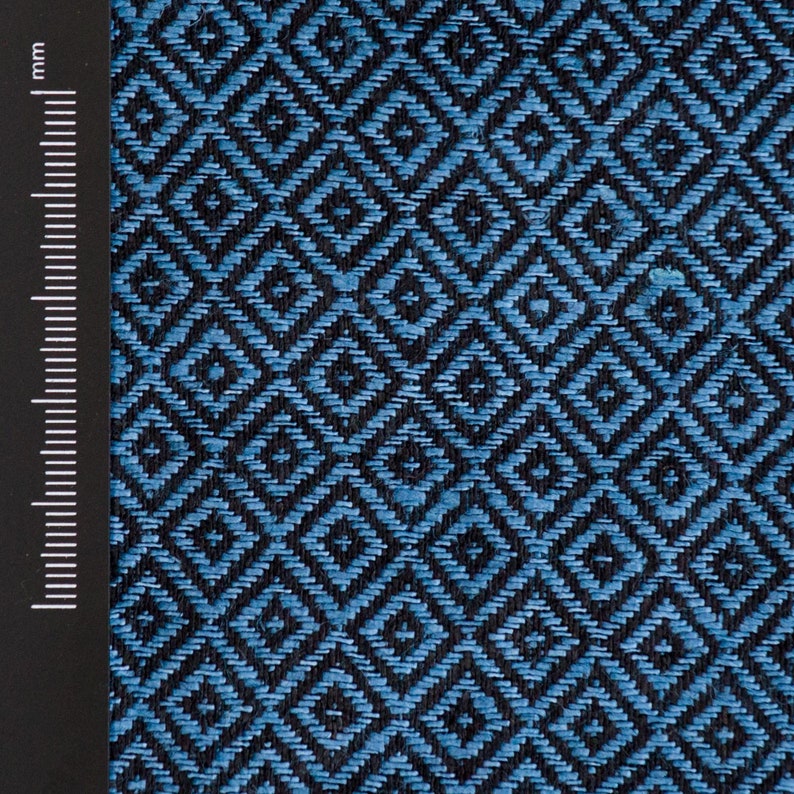
The black and blue sample above is available on etsy in linen from a shop in Poland that weaves cloth for historical re-enacters (SCA, Celtic, Viking, etc.)  I could buy it for about the same price I could order the materials and make it myself.  I kind of want the satisfaction of making a diamond twill in green (I am not so interested in historical accuracy as far as proper dyed colors, though I do appreciate the long history this design has ...)    They also sell diamond twill blankets in wool, that can also be used as a cloak. That would also be nice to have -- and again, I could purchase one for just about the same price the materials would cost.  I have to remember that weaving is a hobby for me -- then there's the entertainment factor, too.  


My next thought was: Well, why don't you MAKE it?  You have the means of production.  That diamond twill pattern is pretty common, and entirely possible on my 4-shaft loom.    I found a few examples of people weaving diamond twill yardage  -- usually for historical period re-enactors: This one is blue on blue and this one where he actually dyed the yarn with a traditional indigo vat.  Diamond twill is a pretty common weave structure, after all.  I have to stick with the 4-shaft patterns.

I found several draft / weaving pattern that I think will work ...  All of these are similar, but slightly different.  Will it be the right scale, or too small?


 I am looking at the green-on-green square in the 2nd row.

Next I need to decide on the yarn --  I am leaning towards 3/2 Perle Cotton, it's mercerized and has a nice luster.  It's durable.  I just need to figure out what size would work the best for upholstery fabric.  I don't want it to look like towels when I'm done.  ;-)

Although I've been weaving for a while -- About 6 years on the Kessenich floor loom, I am still learning new things all the time.  Other than rugs, most of what I've woven so far has been kits or class projects -- which is a great way to learn!  My big challenges this year will be to design my own projects / fabric -- and then USE IT!

Here's a couple of handy references:

As I am planning and designing, this will come in handy and will save me time in NOT having to re-thread the reed because I chose a sett that was too wide or too tight.  It should also help me to calculate how much yarn to order for a given project. 

As for fiber, I had settled on 3/2 Perle Cotton - Dark Blue and Green  - because I thought that would be tough and durable with the depth of color and shine I'm looking for.

Ah, but what blue and what green? There are so many variations!  And it's very difficult to tell what the true colors are online from the pictures posted by different shops.  I finally had to order the color card from Yarn Barn of Kansas -- Then I'll be able to choose the right colors.

I was also looking through The Warped for Good blog, and saw a project where she made fabric for a Christmas tree skirt of out of wool.  It fulled just beautifully, so maybe the Möbelåtta warp and Fårö weft is an option for this or a future project -- In blue and green of course!  THe store website says it's good for heavier home decorating fabrics--Does that mean upholstery?  I was concerned that if I went with wool, I might felt the seat cover because weaving is such an active pursuit!

So-- I am still mulling things over in the planning stages, and have yet to order any fiber for this project.  What do you think?


Saturday, January 29, 2022

World Market Part 1: Indian Kantha Quilts


A few weeks ago, I made an impulse buy.  The ads inserted on my Pinterest feed finally hit the mark.  I'd been seeing these Bohemian (Well, my ancestry is indeed part Bohemian -- How did they know? Ha!)  Kantha Quilts from Embroidery Indian Art on Esty, made from recycled sari silk.   I'd even seen a video of the women working on stitching the quilting lines by hand with big bold straight line stitches ...  Looks like it goes relatively fast.

The top is recycled Sari silk cut into squares and patch-worked together, and the back is cotton.  No batting, so it should make a nice summer quilt.

The cost seemed very reasonable.  I ordered 1 twin for the living room and 1 queen for the bedroom.  If the queen was too big, I could stitch it smaller to fit my bed.  Mostly, I was interested in studying the silk ... and figure out what is a Kantha Quilt, anyway.

The colors were pretty -- I had a hard time deciding between the green, blue or purple quilts. I finally settled on blue and cream.  I was pleased to see the blue quilt was not just blue, but also contained some greens, purples, even oranges along with the blue.   


I also got the cream one.   I was pleased to see that both of them had more colors in them than advertised. 


These silk Kantha quilts make me happy!

Sunday, January 09, 2022

Overshot Scarves: Finishing the Work of Weaving

Overshot Scarves in Green and Blue Wool
 
Green Scarf: Highland Wool dyed green by me
Blue Scarf: Knit Picks Silk and Wool yarn dyed by me
Warp: black Alpaca and silk

I cut the overshot scarves off the loom a few weeks ago, and remembered there's still a lot of work to do before they are finished.


Hem Stitching 

I wound up just zigzag stitching the edges of the hems to secure them.  My hem-stitching comes out with a thick line of raised stitching that does not jive with the rest of the piece.  In fact, it sticks out like a sore thumb in the topography of the woven piece.  So my default is zigzag stitching.  The sewing machine is always up and ready to go in this house!

Weaving in the ends / broken threads

I remember this section.   All those T-pins holding a repair warp thread, hanging off the back of the loom.  At that point, it felt like I was breaking threads with every other throw of the shuttle.  I finally realized that 4 sticks in the DIY tension device on the back end was too much.  So I took 2 sticks out, and didn't have another broken warp for "miles" down the road.  ;-)   After that, I was also beating more gently, not wanting to break more warp threads.  Hence, some of the later circles are elongaged, and not such compact circles.  I'm ok with that.

Once I sat down to do it, it really didn't take long to weave in all those ends.


Twisting / Braiding the Fringe

In thinking about the fringes on these scarves, I decided I did not want to struggle with securing the ends in the hair twisting tool -- That's the hardest part of that operation!  So I was delighted to discover a braiding option -- one that can be done on-the-road while visting my Dad after Christmas.  


One end of the green scarf was braided, and the other was twisted with my ultra-cheap hair braiding tool.    I used the pick to open the clasp that holds the strings.  

Twisted fringe does look better than the braids, so perhaps I'll just have to grin and bear it next time ...


The blue scarf came out quite a bit longer.  I think I probably was not beating as hard, and you can see it in the elongated circles in the pattern.  [MEASURE IT BEFORE WET FINISHING]  Because it was already longer, I did not want to add to the length with fringe, so I decided to hem those ends with a bit of black ribbon.  


Trimming the warp ends evenly.
 
Binding applied and ready to "flip" to encase the fringe. 

The binding only shows on the back side, as the woven black edge of the scarf shows on the front.

It might have been nice to use a satin binding for this purpose, but alas - I had no such satin on hand.


Wet Finishing

Here's the step where you submerge it in a bucket of water for a few hours, then wring out all that water and let it dry.  This step is crucial for helping the disparate strands come together and work as a cohesive team.

In the photo above, I lay the wet scarf out on a towel, then wrap it in the towel and stand on it to wring out even more water.  Then it gets hung to dry by the fire.


 Modeling the Finished Scarves

The blue one was a gift for my husband.  We both like blue.

This is the same Circles Pattern as the red scarf finished in October 2020:


Archiving this Project

I put the pattern, notes, woven sample, and the very long bead string for the treadle sequence, and yarn samples into a zip-lock bag for future reference.   I am already looking at the notes and bead string to set up the new project.  It's been helpful to remind me how I did it the last time!


Previous Posts about this project:

Looming

New Video Demonstrating the Bead System for Tracking Pattern Treadles on the Floor Loom

Something Blue

Mending Broken Warp Strings

Back on the Weaving Saddle Again : Beginning the Evergreen Circle Scarf

Preparations for Weaving: Running a Warp and Winding It On and Threading

Woven Red Circles Scarf is Complete

[Seems like there should be more than this ... if I added the posts about dying the wool yarn for the blue and green scarves.]


Tuesday, January 04, 2022

Free-Motion Boot Camp


I signed up for The Free-Motion Boot Camp with Frances Quilts.  I just stumbled on the class over the Holidays.  Anyone want to join me?

It's an 8-10 week class designed to build confidence in trying new free-motion quilting designs.   I have a number of go-to patterns I like to use, but thought it might be a good idea to brush up and learn some new ones that might become old favorites.

At some point, I found some old quilt sandwiches from a previous class or some that my mom had ready to go ...


Monday, January 03, 2022

My Kessenich Loom Gets The Royal Treatment with a New Wool Rug Under Her Feet

The Kessenich Loom gets a new rug!
Royal red, wool - fancy.  Looks like they were made for each other!

This rug had been in the closet for years, after coming to us when my in-laws moved into assisted living.  Previously there were 2 smaller rugs underneath the loom, but they kept separating underneath.

This is a much better size for her as she can sit completely on the 1 rug now.  I'm sure they'll be very happy together!

Sunday, January 02, 2022

Ready - Set - Weave: Part 2

 Yesterday, I posted about:

Ready - Set - Weave Part 1: Step-by-Step Warping the Loom for a New Project 

Now -- after all that-- we're getting closer to actually weaving!

Once the loom is warped, it's a good time to check for crossed threads.  I do this by opening the different sheds (depress the treadles) and looking to see if it's truly an open shed, or if any thread seem hung up and crossed in between.  No problems this time around!  

If there were crossed threads, this would be the time to make corrections, re-thread and retie onto the apron. 


Spreading the Warp 

The next step is to spread the warp.  I use a junk yarn here, similar to what I'll be weaving with.  It helps to make this a completely different color since I'll be pulling it out once the cloth is cut from the loom.  Having it a contrasting color makes it easier to distinguish from the actual project.   In this case, I used a bobbin and yarn left over from a previous project.

Testing the Modified Plain Weave

This pattern for bath towels says to weave 3 inches of modified plain weave for the hems.   This is another time to look at what your are weaving.  Does anything look out of place?  If so, this is another good time to make any corrections before proceeding with the more complicated pattern.

This looked good to me, so I wove on for the required 3 inches.  I got to use my brand new apple wood shuttle commissioned last fall from a local wood worker out of wood from the local apple orchard.   We have since added a beeswax and mineral oil finish to it that really brought out the lovely character of the wood.  It was very pale and white before the finish.  I like this finish because it feels good, and allows the wood to breathe.  It is NOT a plastic finish.

Testing the Pattern

I had never heard of a modified plain weave, and the tie-ups for the pattern didn't make a lot of sense to me for that ...  The pattern also said it was an advancing twill, though the draft didn't look like anykind of advancing twill I'd seen before.   So I thought it might be a good idea to plot out the draft onto my iWeaveit app on the iPad to see how it would play out.  I thought there might have been a mistake in the draft - which would mean a mistake in how everything was set up - which would mean hours more of re-work to get it right.


So I plotted out the draft for the 4-shaft pattern, which is how I set up the loom.  I wanted to see how it would weave out ...

The 1s and 2s at the top and bottom of the drawdown show how the plain weave would look.  That's just for the hems.  You can ignore that on the bottom.   The pattern shows up in the 3s and 4s 5s and 6s.  But in my mind, this in no way simulates an advancing twill, and there isn't even a hint of the circle pattern that got me to put this kit.

Then it dawned on me: The finished towel they showed for the kit was probably 8-shaft, and of course it would be more complicated -- fancier than a 4-shaft pattern.  But I had just finished a very complicated but do-able overshot pattern that yielded some lovely circles, so I knew it was possible ... 

This is the draft for the 8-shaft pattern along with an idea of how it will weave out.  There are lots of places in the pattern where the structure makes kind of a basket weave and pulls the yarns into a 3D circle effect after it's washed.

That's the 8-shaft pattern.  When I purchased it, I made sure it was suitable for a 4-shaft loom because that's what I have.  I was assured it would work fine for the loom I have -- with a few adjustments for the weaving width. 

For a little while, I was convinced the 4-shaft draft wouldn't really give me the towels I wanted, and since I was not going to go out and buy an 8-shaft loom (not yet anyway!), I even started looking at other patterns - esp. Huck Lace that would give me what I was looking for on 4 shafts.

Eventually I settled down and decided to just go with what was written ....  I could weave 1 towel as written. If I didn't like it, I could re-thread and do something else for the rest of the warp.

  Winding Bobbins

y husband gave me an old cordless drill to wind shuttle bobbins.  

A pencil stuck in the drill bit works well.

Every project has different requirements. Although the smaller apple wood shuttle worked for the modified plain weave for the hems with a lighter thread, I decided I needed a bigger shuttle for the actual work of weaving the pattern part of the towels.  


So I auditioned several of my larger shuttles:

The 11-inch Shacht kayak shuttle was too light for this job.

The older vintage 1980s shuttle would have worked, but it was difficult to get the wire out to replace bobbins without a pair of pliers. I decided I did not want to be held up with that complication everytime I had to change bobbins.

The darker Bubinga wood Hockett Shuttle was too heavy. 

I had also considered using a ski shuttle because I could put more yarn on it than a bobbin.

In the end, I chose the Hockett maple wood shuttle.  It was just the right weight and length, and seemed easiest to throw through the length of the shed to the other side.

So I wound multiple 6-inch bobbins for the larger maple Hockett shuttle.


Finally ready to go ...

Once I chose the right shuttle for the job, I started weaving in earnest.

So far so good. What is weaving out looks basically like what I see on iWeaveIt above.

The good thing is that as it sat for a little while, and got used to living in this weave structure, it looks like there are slants and the 2-up part of the texture hat will shape the circle pattern I was after once it's been washed and dried ...  Maybe?

With 1 bobbin, I can weave about 10 inches.  It actually goes pretty fast. I don't think this will be another year-long project on the loom.  


Here's I'm trying to show how it looks from a distance ...

 ... and zooming into more detail shots ...

 
 I think this might work out OK after all!  Whew!

I do know that because my weaving width is narrower at 29 inches than the pattern called for at 34 inches, I will need to make some adjustments when the weaving is done.  For instance, I may take the 3rd towel and cut it in half so I can graft it to the other two towels to make some nice wide towels.
It's all do-able ...  but for now, I have weaving to do!

Thanks for staying with me ...  and now for a little Winter Night Jazz Music while I weave:


Ready - Set - Weave Part 1: Step-by-Step Warping the Loom for a New Project


Day 1: Running a Warp on the Warping Mill:   3 bouts of 8 yards cotton for bath towels. 

I have a counter app on my phone that helps me keep track of how many threads I've run so far. In this case, I tapped it 4x when ever I got back up to the top.  I was running 2 threads simultaneously, so 2 threads down and 2 threads back up = 4 threads for each circuit up and down the warping mill.  I can get about 150 threads comfortably on this tabletop mill, made by my Sweetie.

Setting up the loom for a new project takes nearly as long as it does to do the actual weaving.  You have to make peace with the getting ready process (ie warping a loom) if you want to weave.  It's gotten a lot easier since I got the Tom Kniesley videos (Weave a Good Rug and Learn to Weave) that lead me through each step of the process as I need it.  He teaches warping the loom front-to-back (as does all my weaving teachers and guides so far).  This works for me. ;-)

This was the most hassle-free warping I've ever done!  I think that has a lot to do with the cotton warp threads -- It reminds me of pearl cotton, but it has a really nice finish on it that must have a little beeswax in it?

Please understand: I do not typically do this entire process in a single day.  It's more like 1 step / day.  I am on vacation this week for the holidays, so I can make more progress than if I were trying to do it on the weekends alone.  It's hard to do it in the evenings after work 1) because I'm tired from work and tend to make dumb mistakes and 2) the light this time of year is so bad, it's hard to see the reed slots and heddles, even with task lighting.  This way, it takes a week vs. 2 months.

I wanted to write this post as a record of what it takes to set up a floor loom -- all the steps BEFORE you get to the fun part.  It's a great example of project management and problem-solving.  I am no longer a complete novice, and it does surprise me a bit that I know what to do when challenges come up!


Day 2: Sleighing/Slaying the Reed

In the videos mentioned above, Tom Kniesley shows how to take the reed out of the beater, and lay it down flat, making it much easier to see the slots to thread them.  Positioning is important to prevent and alleviate pain while warping the loom.  

I use a flat brass sleigh hook for this task.

Looks kind of messy, but rest assured: Things will straighten out. The choke ties are doing their jobs.

In the photo above, I've already re-set the reed in the beater and switched the warp chain from theback to the front where they are roughly tied on while threading heddles ...

Day 3: Threading the Heddles 

The next step is to thread the heddles from the back of the loom.  Again, TK has some great tips for raising the shafts and making the heddle eyes more visible for this process-- bringing them closer. Again positioning is important to prevent and alleviate pain during this process.  

I use a heddle hook for this task.

Once the heddles are threaded, and double checked, I tied them off in bundles.

You can barely see the red markers on heddles of Shaft #4.  The heddles on each shaft are color-coded to help prevent threading errors.  Shaft #3 heddles are blue; Shaft #2 Heddles are green; Shaft #1 Heddles are silver (not colored).

This is how it looks from the front -- with heddles newly threaded.
The heddles are not yet evenly spaced out, and are still bunched up together.

 Day 4: Tieing onto the Back Beam 


View from the side: Tied onto the back apron. 

The loose and saggy string below the rest is one of the ??? that goes through the reed, but no heddles.  It is free to go either way (up or down) to help provide a nice selvedge edge.

Day 5: Winding On 

Back at the front of the loom, I start releasing the choke ties.   With the beater bar up, you can straighten things out by taking hold of one group of warp threads, and snapping it gently, then pulling down to create some tension.  I will also raise and lower shafts to simulate a plain weave -- to help the threads separate and get into formation.


Now it's to the back of the loom to begin winding on ...


Miraculously, those jumbled heddles also snap into place, evening themselves out.

Order from Chaos!  I live this part of it!

As things progress at the back of the loom, I add sticks in the form of angel wings that act as a tension device as I wind on.  Typically, I open the sheds to simulate plain weave and insert the sticks so that one stick holds an opening for the shed from shafts 1 and 3 and another stick for the 2 and 4 shed.  This works remarkably well and helps the yarn wind on cleanly and evenly.


For this project, I am using 3 sticks on the tension device.  There are slots for up to 4 sticks.

This particular yarn -- Cotton is very strong, and seems to be coated with a little beeswax, so it doesn't stick to itself. Very easy to work with -- and strong!  

Here's another view from the back of the loom.
Through the door, you can see the bouts of warp are now unfurled down the hallway.
I weighted them with empty bottles filled with water, which helps put some tension on them as they wind on ...  
In the front-to-back method of warping and winding on, you use the reed and heddles to straighten everything out.  It acts as a comb.   This stage involves a lot of back-and-forth between the back of the loom where I wind on and the front of the loom where I have to comb and straighten the next section to wind on.  At the back of the loom, you wind on as far as you can until the tangles pull the reed and beater forward.  Then you know it's time to stop winding and go back to the front to prepare a new section ...
At the back, I use deli paper to separate the layers of warp as it winds on. Otherwise it can intermingle with other layers, creating tension problems.  


Keep winding on until you get to the end of your warp.

I have the ends secured so they don't accidentally pull through the reed and heddles.


Day 6:  Tieing onto the Front Beam Apron Rod

 Next it's time to tie onto the front beam.  For this project, I took bouts of 12 strings and tied on with half of a lark's head knot.  You work back and forth from middle to left to right keeping things even as you go.  When all the strings are tied on, then you go through and adjust the tension and finish the lark's head knot.  You are striving for even tension across the strings.

This is usually the most frustrating step for me.  Sometimes, I will tie knots at the ends of the bouts and use a strings to wind between the apron stick and the bouts of warp strings.  That can make it easier to make adjustments to the tension -- or not.


Tieing up the Treadles

The next step is to go underneath the loom to tie up the treadles as the pattern demands.

I usually try for a straightforward set-up where treadles 1 lifts (Shafts 1 + 3) and Treadle 6 lifts (Shafts 2 + 4).  That sets them up for plain weave.  This way, it's like walking: first one foot and then the other ...  Then the middle treadles (2-3-4-5) are for the pattern.   I can have one or two shafts attached to any given treadle.

For this particular project, I went with what was prescribed in the draft set-up.


On the top side, I need a way to keep track of the treadles and what order to press on them to achieve the desired pattern.  Someone on one of the weaving Facebook Groups shared this brilliant method of using beads to keep track of the treadles.  In the photo above, I am setting up the bead string according to the draft. ["Shhhh - Leave Mumma be: She's programming!"  said my programmer husband when he saw me doing this task.]

Treadle beads help me keep track of the pattern sequence.

The strings of beads sit on top of my beater bar.  A new pattern sequence starts with all the beads pushed to the right side.  This pattern starts with treadle 6 then 5 then 6 and so on through the string. When I weave a row associated with a particular treadle, I push that bead to the left.  This is usually when I reach to pull the beater towards me.  It's a very natural flow of movement in harmony with the dance of weaving.  The numbers on the beads are big enough that I'm not squinting to see them.  The last project had a 72 beads in the pattern sequence.  The only way I could keep track of it was with beads.  I would have been forever lost and frustrated trying to read it on paper.

Are you still with me?  We are almost ready to weave!

But I'll leave part 2 for tomorrow:  Ready - Set - Weave: Part 2