This blog records my experiments and successes with fabric and fibers, surface design, stitching, weaving, photography and whatever else strikes my fancy. Enjoy ...
My friend Lynda came over today to help with the warping. We were able to thread half the heddles in record time -- just a little over an hour. It goes a lot faster with good company, and 4 hands.
I used pipe cleaners to hold the cross while I threaded the heddles. The pipe cleaners hold the streams of yarn well enough, yet it's easy enough to get the top set of yarns free.
Here, you see it mounted on my heddle jig which is clamped to the breast beam.
Tieing onto the apron.
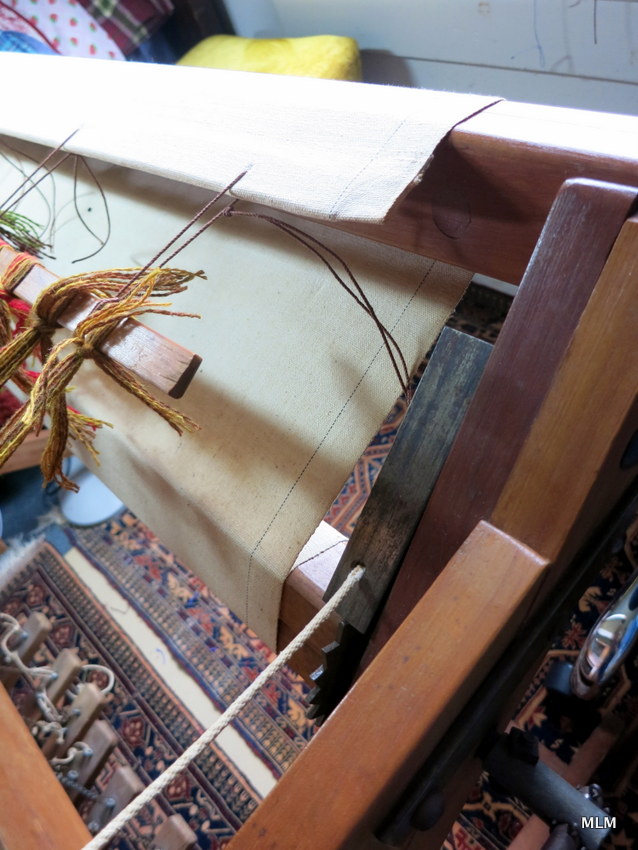
Detail of the Weaver's Knot used to tie onto the apron.
This one is just a reminder to showing proper path to wind on a warp. The apron goes up-and-over the back beam, then under and around the warping reel. Makes a backwards S from this angle.
Using Lease Sticks to maintain order.
The Chaos Side - needing to be combed and tamed.
Ahhhhh ....
The progress is slow, but satisfying.
As we were working on this, we found that the Shetland wool was sticking to itself. Lynda kept asking me if this was a kit designed for beginners. Not exactly.
I had planned to set it up as a double weave, with 4 strings through a 6-dent reed. We determined that plan would have been problematic when it came time to weave--especially in such close quarters. There's a possibility it would felt itself in the process ob rubbing back and forth to get the sheds open.
On to Plan C : I will be ordering a new Stainless Steel 12-dent Reed from The Woolery this week. That will give the yarns more breathing room. It's crowded enough here with the double weave set-up.
We won't be able to finish warping until a later time.
This is the other project currently in progress. A big applique Polar
Bear. I finished up the stitching last week. The idea was to make him
look kind of like a crazy quilt with the fancy stitches tacking down any
loose edges.
I did the stitching with the applique and 1 layer of
batting as stabilizer. I will add one or 2 more layers of batting to
give it a trapunto-type look. That gives it more life, and will make
him look 3D.
After that, I can cut him out and apply him to the final background scene ... Stay tuned!
This is where I was testing out various fancy stitches and thread colors. This also lets me check for any tension problems, so I can make adjustments BEFORE getting to the Polar Bear.
I bought the kit and pattern a few years ago at a Quilt Shop in Appleton, WI.
The Glimakra Swedish Ski Shuttle works beautifully for this application. I bought a 2nd one from Saori Sata Cruz on Etsy. It's a very similar design to the Glimakra, but with beautifully finished woods (maple, walnut and cherry).
My loom doesn't give me a wide enough shed to use a regular rag shuttle. So the ski shuttles are just the thing! I can wind on a good chunk of yarn or rag to keep me weaving for a while.
Here's the front of the rug, on the floor. I haven't done the wet finishing yet, nor have I sewn the hem stitching to the back side yet. I was just so excited to see it come off the loom -- cloth that I made myself!
The "water staining" you see (for lack of a better word) is actually where we stepped on it to test it out. It's where the velvet pile is laying down. So it's not actually water stained at all. Now when you look at it, you'll see a definite footprint shape--am I right?
I'm also amazed at how easy it was to keep the selvages for this project. I had purchased a temple, but didn't feel I needed it on this rug.
Even the back side is pretty.
In this picture, the top is where I started weaving. You can see as it progressed how I was not so rigid about how the weft strips were twisting. It gives a pleasing effect on the bottom 3/4 or the rug. Note to self : that this should be allowed and encouraged!
Detail shot of the back side of the Red Velvet Rug.
It makes a nice soothing texture in and of itself!
It was only last week that I started ripping the velvet from the old red theatre curtain. This piece had been washed, so dust was no longer a problem. I'm hoping the washing also took out any particulates from the fire-proofing, too. I did this work outside, since there are many pills and strings produced in this deconstruction process.
It rips beautifully! So I suspect rag rugs are an appropriate way to recycle this old velvet.
The piece I was ripping strips from was about 1/2 the length of a single panel from the velvet curtain. So my strips are about78 inches long. I ripped them into1/3 inch to 3/4 inch strips.
The next step was to sew them end-to-end, which will make it easier at the loom when I am weaving them into the fabric. Once I had 5 or 6 strips sewn together, I wound them into balls (like yarn) to keep them from tangling.
This appears to be the most I can wind onto my ski shuttles to do the actual weaving. I am using a plain common weave for this velvet rug.
I am using up the last of the warp currently on my loom. We set it up for rug-making last fall, and so far, I've been experimenting with weave structures, and using up some really soft alpaca yarn to make a twill cloth. I thought it was about time to actually use this warp as planned and weave a rug.
The velvet strips are packing in beautifully! And it goes fast! In no time, I had about a foot of cloth ready to go. I can see how this could be addicting! I could make a single rug in one evening. Not bad for productivity!
Here's a pic with a penny as a gauge to show how wide I was ripping the strips to get this effect.
Plus the growth rings from the tree adds yet another layer of circles.
Concrete Culverts from a Construction Site
I was also thinking about rain drops falling, and the circles the ripples make from the drops.
Circles in Motion.
Not a great image (It's tricky to shoot in the rain), but something to work on for the future.
Or even video.
I am participating in Denise Love's 2017 "Let's Do 52 : 52 Weeks of Photo Prompts" to kick start the lull in my photography. If you'd like to join us, find out more at the link above. The more the merrier!
For the past 5 years (or so), I've participated in Kat Sloma's Liberate Your Art Post Card Swap. The project encourages Creatives to PRINT and reproduce our artwork (bringing it into the world) and to share it with other Creatives. Every year, I am amazed at where my post cards wind up -- as if they are my own children with lives of their own. They see things and go places I've never been, yet they are a part of me making their own way in the world ...
The card above is the one I sent out this year. It's a photo from the Ren Faire, of a performer in Sirena, worked up in
PhotoShop and Topaz Impression. One of my favorite images from last
year. It was really neat to see it professionally printed. I had a WOW moment there when the cards came back. Unfortunately (or not), I had ordered the wrong size to participate in the LYA Exchange, so I'm saving these for side swaps. I wound up printing the right size cards on my own home printer--not quite the same effect.
This year, I decided to send out 5 copies of the same card, as I thought that would make them easier to track out in the world. Kat asks that we photograph each postcard in it's new environment, to give an idea of where it landed. So far I've heard from the following people who let me know where my cards went :
1) Jacksonville, FL
2) Fredericton, New Brunswick, Canada (She got the 1 Dancer Card)
3) New Jersey
4) Cape Charles, VA
5) ???
Here are the cards I received in the official swap :
A beautiful watercolor - summer view of the San Francisco Peaks from Flagstaff, AZ.
From Christine G. Brooks.
From Beth Laverty. She says she takes her camera everywhere. This was the view on her windshield one day, before she put on the wipers. Kind of like the veil is parting, and you can see into another dimension for a moment.
The aim of art is living creations." --Steve Albers
This is the card that Kat Sloma, The LYA Organizer sent out this year.
Every year, I've had the good fortune to do some additional post card exchanges in side swap. Some of these people I met the first year of the exchange (like Snap Lane in Houston). Others I met through the FaceBook Group, or the blog hop. Some have stayed on the side swap list every year since. Some are new this year ... It's easy to set up a side swap, especially if you like that artist's work.
These are the cards I sent out for Side Swaps this year.
Here I am experimenting with shadowplay and photographing it where it landed.
Adds a whole new layer to Lisa's Dream image.
Little Dipper Bird from Sherry Harmes in Larsen Bay, Alaska.
Gorgeous Daffodils in black and White came from Janice Darby in California.
No one else but Janice would think to do daffodils in black and white! Makes me see them in a whole different light. They are NOT all about the color, after all!
From Kathy McIntire at Funky Folk Art in Columbia South Carolina.
Beautiful Carosel from Tammy Wilson in Georgia.
From my friend J who recently visited a fancy museum where they were showing Henri Matisse paintings.
"Dance Your Heart Out. Keep Moving"
I absolutely LOVE this one, too!
From Christine Brooks in Flagstaff, AZ.
I think I'll hang this one up in my sewing room where I can see it regularly!
Want to see more? Kat created a video showcasing the artwork in this year's exchange :
There's also a FaceBook Event Group for Liberate Your Art.
Or use the social media tag #lya2017
Check out my LYA blog posts from years past.
Thanks for stopping by my corner of the web!
Have a wonderfully creative year!
The Blog Hop is happening April 14-16, 2017.
See where your art landed ... It's kind of like tossing your cards up in the air, and seeing where they landed around the world. Join us ...
I wanted to get a photo of the warp as it is shaping up -- also to keep some notes for myself.
It looks so pretty and orderly all lined up here. Sigh!
I signed up for the Floor Loom Weaving Class at Craftsy. $20 for many hours of instruction with Janet Dawson. This has been wonderful, as I can go at my own pace, and look back at lessons as I need to -- I'm not doing the official class projects, but instead working up a Shetland Wool Color Gamp. My loom is not wide enough to do it properly, so I'll be doing it in DoubleWeave Double Width (not part of the class btw). That's why you see the colors matched up in the warp. One color (ie black) will be the warp for the top cloth, and the other (ie blue) will be the warp for the bottom cloth -- if that makes sense. They will sort out and separate on the loom. Once I get this all strung up and properly warped on the loom, it will make more sense.
This is the pattern I followed. The video recommends running a guide string so you can easily follow the path you chose among all the pegs. My board is laid out a little different from what Janet uses in the videos, and I wound up with a 2nd cross at the corner. I guess I could have made A the unnamed peg in the corner. No harm done, though. I was able to push off/pull out the 2nd cross when I pulled the warp off.
The photo show how the cross is tied and secured, so I don't loose it between now and when I actually start warping the loom--which might be a few more weeks.
To keep the color pairs in order, my husband whipped up this little spool rack. I have since numbered them, and marked which ones will be set for the top cloth and lower cloth, and which heddles I need to use when I get to the warping step.
Here's the 2nd half of the warp. I had to back up a bit and pull the purples, greens and burgundies that were on the first part into this set. I thought it was a better idea to divide them evenly rather than keep a lopsided warp--which would make it harder to find the center when I got to the warping step at the loom.
Backing up a bit was a good idea anyway, because ...
Lessons Learned :
1) Don't use too much tension while warping. This wool is strong, but it will break under enough tension. I had the burgundy and avocado colors with the first batch, only because I was hoping to fit the whole darn warp on the board at once -- just to see the rainbow colors all lined up, and orderly. But the board wasn't quite big enough to fit all the ends on it at once. By the time I got to the burgundy and avocado, the tension towards the end was so tight that the anchor peg at the bottom was actually bending inward to relieve some of the tension. So it was a good thing I had to re-do that color set.
2) A Double Cross doesn't cause any problems. It's kind of fun to do, and you can push it off the end once you pull the secured warp off the board.
3) I need to find a more solid place to hang the warping board while I'm working on it. Right now, it stands on an old treadle sewing machine, but it's not secured, and it can move on me at all the wrong times.
4) I need to go back and secure all the pegs with some wood glue. You don't want any pegs falling out while you're warping!
Here is the amended path I took for the 2nd half of the warp, to avoid the 2nd cross in the corner between pegs A+B. Much more open.

 I used pipe cleaners to hold the cross while I threaded the heddles. The pipe cleaners hold the streams of yarn well enough, yet it's easy enough to get the top set of yarns free.