Tuesday, December 05, 2006

Oliver - Almost done!

Here's the full view. I finished the background quilting. I still need to cut it down to size and add a binding.

I also plan to add some beads to the sunburst on the bubble bottle.

If you liked the 1st face, it's underneath this one.

It's only taken 2-1/2 years to get this far!
This has certainly been my biggest challenge so far! Posted by Picasa

Oliver - 2nd Face Detail with Threadpainting

Here's a detail of the revamped face after threadpainting. The eye lashes really add a lot of life to it ...

I left the net on his part of his neck. I just could not find the right color of fabric to make it work for his neck.

The Bubble :
The shiny edges are made with Angelina Fibers.
The full circle is made with bridal netting/tulle, edged with an oplalescent thread and a satin stitch. Posted by Picasa

Oliver - 2nd Face Detail

Here's the 2nd version of Oliver's face.

I took an online class through Quilt Univeristy (www.quiltuniversity.com) on Fabric Portraits taught by Marilyn Belford. She recently published a book by the same name that explains her technique. It really filled in the features of his little face.

This is BEFORE any thread painting. Posted by Picasa

Oliver - 1st Face Detail

Here's a close-up of the first face. You can see the netting, and how a double layer makes it look like cross-hatch shading.

This is also before any thread painting.

Where's his nose?!?Posted by Picasa

Oliver - Round 1

This is my first attempt at rendering the photo in fabric.

I was pretty happy with it, but I thought his face looked kind of cartoonish. Not enough detail--even though it sort of looked like him in it's simplicity ...

I used tulle/netting to create the shading on his arm and on his face. This was a technique I picked up from a book on fabric collage by Susan Carlson. I really liked the way some of her pieces turned out. The netting creted some wonderful shading without making it look like a totally different pice of fabric--and it wasn't too hard to do with a little Steam-a-Seam 2 Lite.

His "Little Blankie" at his knees is made from scraps of another (more traditional) quilt I had made for Oliver. Posted by Picasa

Line Drawing of Oliver

Posted by Picasa
This is the line drawing I developed from the photo below.


I printed a color copy of the photo as big as would fit on 8-1/2 x 11 inch paper. Then I went to work with my light box (I LOVE my light box!). It took a while to develop the sight to turn a photo into a line drawing. Then I took it to a copy shop and had them blow it up to about 3 feet. They can do this on a special copier anf they charge between $2-4. It's so much easier than trying to struggle with an projector ...

Oliver

This is the original photo I took of my son when he was 2-1/2 years old. I knew I wanted to turn this image into a quilt, but how ...? Posted by Picasa

Monday, December 04, 2006

Thread Scarf

Posted by Picasa The thread scarf I made at Conversations in Cloth one night in August 2006.

The basic technique (very abbreviated) :
1. We used masking tape on the table to act as a template to keep the desired size and shape for the scarf.
2. Lay out a sandwich of water soluble stabilizer.
3. In between the stabilizer layers, threads, yarns, fibers, fabrics, scraps--anything that can be sewn-- are laid down in a desired pattern.
4. Use spray adhesive to hold everything in place
5. Sew! Sew! Sew!
6. Melt the stabilizer in water.

Presto! You have a treasured hand-made work of art!

The purple "globes" look like plums, or bunches of grapes, or even the eyes on the wings of a moth.

I used 12-wt. varigated quilting thread to hold the threads and yarns together. The heavier-weight thread has more body to hold the architecture. I don't worry about it catching on a snag and breaking. It's sturdy stuff!

Peace by Piece 2005 Challenge

This is my 2005 Lakeside Quilt Guild Challenge piece. We were given the poem and a fat quarter of the blue-green fabiric.

I decided to try a few new techniques and got some Quitagami books from the public library. The flying geese, pinwheels and "knifepoint folds" are all folded fabric with 3-D effects. The points can be flipped up.

I like the general idea of this technique because you can get some neat 3-d effects simply by folding the fabric.


This was also my first attempt at free-motion machine quilting.

The hardest part of this project was not having a pattern to go by. The make-it-up as you go model does take more time because there's a lot of trial and error involved. Somethings just don't work as well as you had hoped ...

This piece hangs in my mother's sewing room. She's also a quilter. Posted by Picasa

Saturday, October 07, 2006

Three Jacks

This was an experiment in trying new techniques.

Jack-o-Lanterns are quick and easy subjects!

Reverse Applique (Left & Middle Jacks)
1) The fabrics were layered : black on top, bright underneath(I only used 1 layer in this experiment, but you could use several layers), batting and backing.
2) Vague pattern was drawn on with chalk.
3) Sew around the shapes, and cut away the fabric until you get down to the layer you want to see.
4) Then zig-zag to secure the edges as for applique.

Soft-Scrub with Bleach Discharge (Right Jack)
I made a stencil out of contact paper and painted on the Soft Scrub. After 15 minutes, I rinsed it out. The light parts of the face is the same black fabric discharged of color. It doesn't look like much until you know the technique ...

After the general faces were done, I again chalked out the general outlines of the pumpkin shapes, and threadpained in the lines for the pumpkin and stems.Posted by Picasa

Celebrate!

I had seen journal quilts like this in Chicago, and wondered how thry were done ... Then I stumbled across Quilt University on the Internet. They were offering an online class in it over the summer. I was intrigued : How would an online quilt class work? (Remarkably well, actually!)

We pieced a starry night background. Each starburst/firworks has a bright patch at it's center. Then we thread painted back and forth and back and forth. 1 starburst typically took about 45 minutes to complete.

I used a variety of metallic and embroidery threads (had to buy some new ones to add to my stash, too!)

Tips on working with metallic threads :
1) Sew a little slower. The heat and friction can break these delicate fibers ...
2) Use a metafil needle, or a #14 topstitch needle. These have larger eyes that are easier on the threads.

For the sparkle, we were supposed to add sequins and beads ... I don't have the patience for hand-work, so I went the hot-fix route and used iron-on crystals. It's too bad the sparkle doesn't come through on this photo ... It's better in person!Posted by Picasa

Day at the Lake 2 (2006)

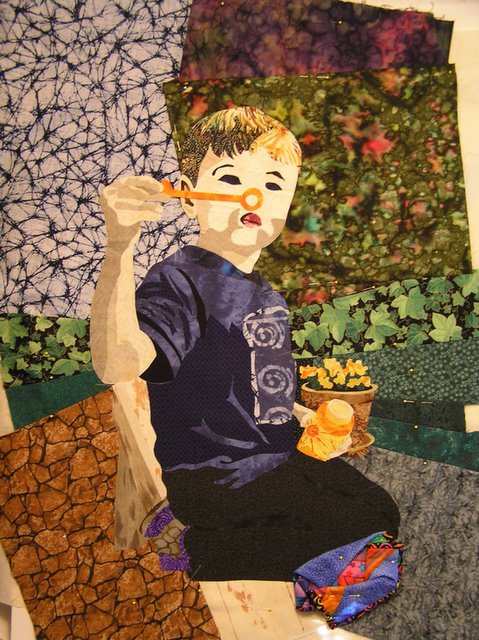
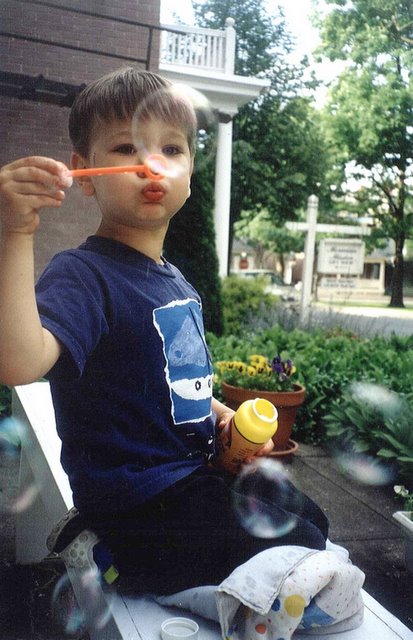
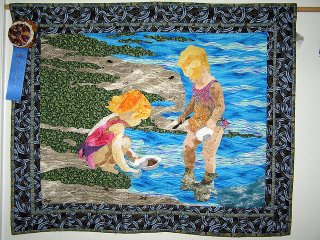
I designed this quilt myself, based on a photograph. Development took the longest time in figuring out how to go from the photo to an applique quilt pattern. (I love my light box!)

There are some great resources out there :
Charlotte Warr Anderson's books (if you can find them)
Marilyn Belter now has a great book on Fabric Portraits as well (though it hadn't been published until after I had this completed).

Another tip on this process : Make your master pattern 8-1/2 x 11 inches. Then it's a very simple, cheap, easy and quick process to take it to a copy shop and have them enlarge it to your desired pattern size (between $2-4) (up to 3 feet).

I used a fusuble web applique method, stitching the edges down with invisible thread. Then I started threadpainting.
* Metalic green thread on the seaweed makes it look like it's wet and glistening in the sun.
* Someone from my art quilt group also suggested using glitter paint to make the sand sparkle. This worked really well on the water, too!

I had originally done this quilt for a show in my hometown this summer. The theme was "On the Lake." At my local Quilt Guild show this fall, this quilt won Viewer's Choice for the Art Quilt Division. This is the first time I've ever won anything at a quilt show!
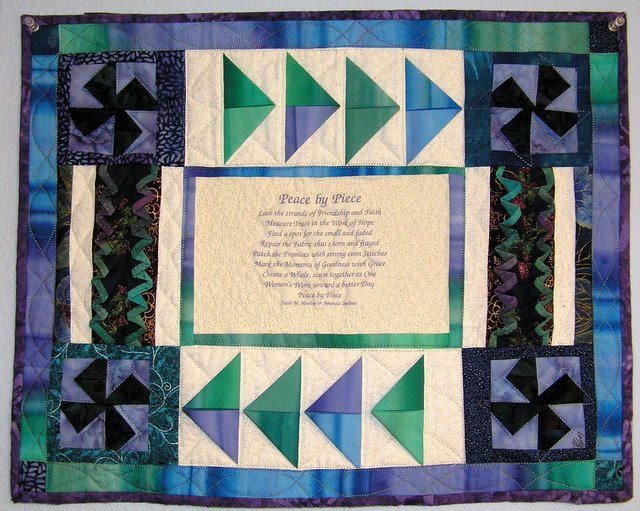
 Posted by Picasa

Sebastian Bear at Cranberry Hollow (2004)

This project is a pattern from Bee Creative. I learned the value of color, and light. My quilting teacher at the time (I was also learning to applique) suggested I use silk leaves instead of trying to traditionally applique them all. Hence, the leaves have an added dimension since they are only attatched down the middle. This was also one of the first bindings I did - notice the wave across the top. My bindings have significantly improved since this one. Posted by Picasa 


Bear eating Berries by Amar at Banff Moments.