I've been reading Mary Meigs Atwater's The Shuttlecraft Course in Hand Weaving, which she wrote back in the 1920s. One of the first things she says is that a new weaver should do sectional warping, and not try to warp a loom with other methods which she deems a complete waste of time. Although I am no longer a new weaver, I am always on the hunt for techniques and tools that will help make weaving easier / smoother. Winding on with even tension and otherwise dressing the loom is something you have to make peace with if you want to do the fun part of weaving. Still, even though I've found techniques that work for me, that step is still a pain point.
I got a bonus at work, and decided I wanted to spend it on a sectional warping beam for my big "new" 8-shaft loom. So I called Bruce at Kessenich Looms, knowing he's getting older and if I wanted one, I'd have to order it before he retires. Turns out, he spends most of his time on the phone helping people refurbish their older Kessenich looms. He won't build me sectional warp unless I ordered an entirely new loom. Although, he seemed to think it would be easy enough to make the 4 rails with the wooden pegs spaced 1 or 2 inches apart -- "Just find a local woodworker ..."
Although my husband and I have made several DIY weaving implements, in this case, I concluded there's a certain amount of precision required with this project, and I would just as soon spend my precious time outside of work weaving or quilting, rather than woodworking.
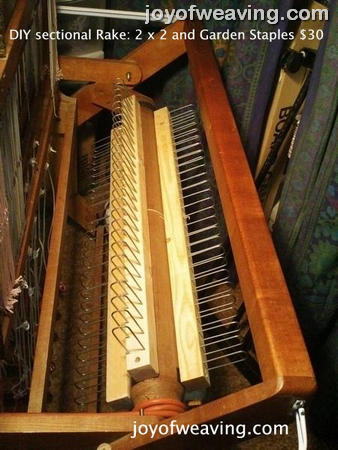
I did find a Joy of Weaving post about a DIY sectional warp beam rake and guides ... I didn't think those garden staples would be durable. Or maybe they were of better quality back when this sectional beam was made?

Although I may ask Janna's dad to make the kind with wooden pegs for the smaller loom. The photo above shows the one Schacht makes. This is similar to the one Kessenich had, too, with the wooden dowels, or pegs. If they were spaced 2 inches apart (as opposed to the 1-inch variety), it would be do-able as a DIY project.

In the end, I decided to purchase the Leclerc sectional warp beam along with the tension device from The Woolery.
The description says:
"Many weavers use the Leclerc 1" section beam on non-Leclerc looms (because very few manufacturers offer SWB in 1"). This will require drilling new holes on your warp beam. The results are excellent and the 1" sections seem to be more reliable (than 2")."
From the looks of it, I'm pretty sure we can make that work on the beam I have on the 8-shaft loom -- and save oodles of time trying to make the rails, drilling the holes and trying to keep them evenly spaced. I'm sure I'll have additional posts as we do what we need to do to make it work on the loom I have.

I also ordered the Leclerc tension box, which is an essential tool for sectional warping. Again, this looks like it would be simple enough to build, but who's got that kind of time? Or the equipment?
Warping a sectional beam via warping board (Part 1)
Warping a sectional beam via warping board (Part2)
I'm not crazy about having a giant spool rack with 30-40 spools on it either, so I found a way to use my vertical warping mill to run warp chains for each section, then run those through the tension box to get them onto the warping beam in sections. I think that method will work for me, and save having to purchase extra equipment, and the sheer expense of purchasing or winding so many spools, and finding a place to store all that extra equipment.
I am so enjoying the coverlet project, that I think I would like to put on an extra long warp and keep that going.
No comments:
Post a Comment