Tuesday, December 08, 2020

In the Dye Pot - More Preparations for Weaving

 Knit Picks Fingering Gloss (merino wool and silk) dyed with Procion Grape and Cerulean Blue. 

Dharma has a method for using fiber-reactive dyes (using vinegar, salt  and heat in place of the soda ash) on wool.  I've had good success with it, as you can see!

Turns out, I wasn't all that enamored of the 'spensive cashmire yarn I bought to make more circle scarves.  So I looked through my stash to see what I could dye myself that was a comparable fiber type (not cashmire, but soft) and weight.  

I had some alpaca and some Knitpicks Merino and Silk that look to have the same weight (1 or laceweight).

It's my usual comfortable color pallet:  Blue, Green, and Purple.


Procion Cerulean Blue (Knitpicks Gloss: Merino and silk)


Procion Cerulean Blue in the dye pot. 


Dyer's notes.

In the Dye Pot:  Bring water to just below simmering.

Add the following:

  • 1-1/2 T Salt
  • 1/3 cup Vinegar
  • 1/4 cup Dye Stock (I could have used more.  These feel a little too pastel-y.)
  • Add pre-soaked yarn.
  • Simmer until dye has been taken up by the yarn.   (About 2 hours or so.)

  It came out a nice sky blue.


Yarn label.  Knit Picks Fingerling Gloss. 


Procion Grape (with a little extra Cerulean Blue) on Knitpicks Gloss: Merino and silk.


 Dyer's Notes.


Procion Leaf Green on alpaca yarn. Looks almost black!


Dyer's Notes.  I thought I might have to mix the color myself.  Greens and purples are tricky to get "just the right color." 


Yarn label with specifics. 

 This is how it came out -- much lighter than I expected. More of a Granny Smith apple green.  Gorgeous under normal circumstances, but not quite what I was going for here ...


All of these came out pastel-y.  Will another round of dye deepen the colors?  

What if I use the Wilton's food coloring dyes this time?

Monday, December 07, 2020

Preparations for Weaving: Running a Warp and Winding It On and Threading

A few weeks ago, I wound a new warp to make more circle scarves, using the new black alpaca and silk, rated for weaving.   This task is so much easier with my warping mill, than it ever was on a warping board.  I'm so glad I made the transition.  I am much happier, and so is my body!  Now instead of sheer frustration, aches and pains that come out in a warp plagued with tension problems, using the warping mill makes it an even flow meditation.  Nice and easy!  And the click counter app on my phone helps me keep track of how many ends/strings.   Read more about making your own DIY warping mill.  [Thank you (again), CL, for making this for me. I LOVE it!]

The specifics of this warp:

This is about a 5-1/2 yard warp with 146 ends (10 extra in case any break and need repairs, mid project). 

Laceweight alpaca and silk.  It's strong, but just a little "sticky."

The pattern calls for 134 ends and a 3-yard warp.  I am hoping to squeeze 2 scarves out of this warp, so I added a little extra. 


On to loading the warp to the loom.  This stage always takes longer than I ever think it should.  So many starts and stops here.  My first thought was to tie onto the ends of the old warp, since I'd be making more of the same circle scarves.  So nothing about the general set-up of heddles or treadles would change.  So I had the picture showing how to tie a Weaver's Knot in front of me as a reference, and began tying the new warp ends onto the old.   It started out very awkward, but eventually, I found a groove and developed a system -- or so I thought ...

 Weaver's Knot

When I thought I was done, and pulled them through the reed and heddles to the back of the loom -- It turns out about 1/3 of my weaver's knots failed [YIKES!] and let go before they got through the obstacle course I'd set for them-- through reed and heddles.  It was such a mess through the heddles that I finally decided to pull them all and just start from scratch with threading the heddles.  That way, I could keep track of the pattern and what was supposed to be where.    That didn't take so long as I thought it would.  Happy me!

I always have to do this in stages over a couple of days (even weekends), so I can be fresh for the next step.  I have my Guide-at-the-Side with me: The Tom Kniesley weaving videos on Interweave on my ipad to lead me through every step of the warping process.  Today it was tieing onto the back, and winding on the warp.  Again-- you'd think it would be quick and easy-Zip-Zip--but no!  


I pulled it all through once, got the tangles out--I am always amazed that the snarled mess on the front side eventually resolves without too much fuss and bother.  But the tension was pretty bad and I broke 3 strings in the process.  So I repaired the 3 broken strings, grateful I'd run a few extra in anticipation. 


Angel Wings Tension Device at the back of the loom.

Then I pulled the entire warp through again -- this time, nice and straight, no tangles.  This time I used the tension device at the back of the loom -- it's just 4 rods to help even out the tension as I'm winding on.  This helps immensely!  Things wound on much easier this time, with much better tension.  Whew!  But I broke 2 more strings this time.  So I fixed those ...

And tied onto the front.  This time I used a cord like my weaving friend Lynda Collins showed me. TK has you tie on to the apron with knots just like you do at the back.  The cord makes it much easier to adjust tension as things shift.  


Next, it was time to check my work.  "Let's see how we did." -- as Steve Reichlin says on Barbecue U on PBS.  


Open Shed from the side. Nice and clear!

I checked the sheds for shafts 1+3 and 2+4.  This is the basic common weave /plain weave configuration.  So far so good!  No strings out of place, or hanging loose (except for the floaters on either end) which are expected, as they are not tied to any heddles.  This alpaca silk yarn is kind of "sticky," so I'm also hoping that the tension bars at the back will also help keep them separated so that they behave by the time they get to me on the weaving side at the front.  

Next it was time to spread the warp by weaving some waste yarn to get things started--see the blue weft above.  So far so good!  All the ups and downs for plain weave look good so far.  No missing strings.  Nothing mis-threaded.  Yeah!  Progress!

Time to start weaving the first real shots.  What to use for warp?  

  • The alpaca/silk?  
  • Or the remainder of the black merino from the red circle scarf?  Do I have enough to finish a scarf?  I wound the remainder of the black merino from the last project.  5-1/2 bobbins.  I should have kept better records, but I didn't think that was going to be enough to finish a whole scarf, though it would be easy enough tot get more Jaggerspun black merino if I needed more.
  • I went with the new black alpaca silk mix.  Same as the warp.  That wove very nicely for the first band of plain weave.  So far so good!

 Black Bobbins - Black alpaca and silk. Same as the warp. It has a little sparkle to it. 


The Weft:

Turns out I wasn't crazy about the 'spensive cashmere yarn I bought  a few weeks ago to make more circle scarves.  I think I'm going to return or exchange them ...  The colors were not true to what I thought I'd be getting.  Maybe they'll work for some other project?  In my mind, this scarf pattern calls for a solid dye job.  Even though the gradients were pretty, I don't think they'll work for this pattern -- there's too much going on with the pattern, and the color changes will not add to it. So I fired up the dye pots!


Treadle Tracking System made easy with beads. I would never be able to keep track of where I am in this long and complicated pattern without this ingeniously simple system.  Read more about it.


Neptune green cashmere yarn ball and sample weaving.

After I knew the plain weave worked, it was time to test the pattern, so I ran through 1 cycle of the pattern (72 treadlings!).  See the 2 rows of circles in the green/blue gradient.  The pattern looks like it's working as far as threading goes -- sort of -- I need to check the heddles on either edge to be sure ...  


But the coloring of this yarn (beautiful though it is in and of itself) is not appropriate for this project.  The pattern gets lost ...  See the comparison with the crisp and clear red version above.  

I'll put this down to sampling, and unpick it, by running the beads/treadles in reverse.

Ugh!  I think there's still something wrong with the threading through the heddles.  I'll need to check that in daylight -- which means I won't get to it until next weekend.  Getting ready to weave takes as long as it does to actually do the weaving!


Sunday, December 06, 2020

Farmer's Wife Blocks - 3 Basket - 14 Butterfly at the Crossroads - 63 Ozark Maple Leaf

Block 3 - Basket
 Paper-pieces with a little fusible applique for the basket handle.


Block 14 - Butterfly at the Crossroads

Not paper-pieced.  The 5x5 grid made for cutting some odd-ball measurements (7/8 and 11/16), but I did it.  And the block still came out too big.  I will have to go back and shave out about 3/4 inches to make it the usual 6-1/2 inch block--probably along the blue cross pieces down the centers.

Nesting seams is a great tool to make things match up properly.   I probably learned that trick from Nancy Zeiman!


Block 63 - Ozark Maple Leaf

For the life of me, I could not SEE a maple leaf in this block as given in the templates.  However, in my research looking for color options, I came across this tutorial with a slight difference in the corners.  And that one little design change made ALL the difference in transforming this awkward block into more of a maple leaf--to my eye at least.  It still looks blocky, awkward and square, but the half-square triangles are a big improvement! [What kind of maple trees do they have in the Ozarks with square leaves?]

In my defense (or to my credit), I live in Wisconsin.  There are maple trees all over my neighborhood.  We have real maple syrup on our pancakes and French toast -- no excuses for any corn syrup substitutes.  I know what a maple leaf looks like, and this block as given didn't even come close.

The colors in this block may be a departure from the color palette for the rest of the blocks.  I went with orange in an attempt to evoke a maple leaf (again) because the shapes in the block itself are strange to my eyes.  I am pretty sure it will still work in the overall quilt top, once it comes together.  ;-)


Tutorials from Handmade Karma for Week 12.

See Handmade Karma's full set of Farmer's Wife blocks and tutorials.


Monday, November 30, 2020

Nancy Zieman: Extraordinary Grace


Wisconsin Public Television recently aired a documentary in homage to Nancy Zieman, aka Sewing with Nancy.  Seems like she's been on tv for most of my life.  She started her tv show in 1982.   I didn't really start watching it until the early 2000s when I started quilting.  That was also a time when I had a professional career, and a family, and little time for myself in between.  Sewing, quilting, and otherwise nurturing my creative life was how I got back to myself.  As Alice Walker says : “Whenever you are creating beauty around you, you are restoring your own soul.”   Saturday mornings, I would tune in with my notebook in hand, taking notes on her projects and techniques--especially all the shortcuts for quilting, but even practical things like how to install a zipper, too.  I bought several books like the Landscape Quilting series and I Love My Feet (all about the various sewing machine feet).  I learned a lot from Nancy Zieman, and I am grateful to her for sharing her knowledge so patiently and clearly in my living room. 

She lived just down the road in Beaver Dam, WI.  I'd been to her Nancy's Notions store a few times, especially when I needed to stock up on sewing machine needles. Though sometimes it was just as easy to order from her catalog.  According to the documentary, Nancy's Notions began on her dining room table with 10 items on a 1-page order form, and from there it blossomed into the business it became.   When she taught or demoed projects and techniques, people wanted the tools she was using -- and thus began Nancy's Notions.

She came a few times to our local Quilt Guild to speak and present.  She was always happy to do it.  She sponsored that big Quilt Expo in Madison.  I had no idea she had so many health problems later in life. 

When I had heard of her death in 2017, it was one of those moments when the earth shakes.  I felt like I'd lost a great mentor and teacher and friend.   And the world had lost someone kind and caring.

She was an unlikely tv personality because she had Bell's Palsey when she was a kid, due to an ear infection when she was a toddler.  It left her face partially paralyzed.  As you can guess, that was a difficult thing to overcome -- people always judging her before really knowing her.  It was a hurdle she worked hard to overcome.  And she did it -- marvelously!   One episode she even brought on a Neurologist (doctor) who could explain to her audience what Bell's Palsy was.   They no longer had to be curious about it.   She was a teacher first and foremost, and her classroom happened to be a television audience. 

Thank you, Nancy Z.  You made the world a better place.  Sigh!

Nancy Zieman: Extraordinary Grace 

  • You can watch the whole program on Passport if you are a regular subscriber to WPT. 
  • Or wait for them to re-run it live on your own PBS station

Preview for the documentary 

These days, you can watch Sewing With Nancy  on multiple channels and across the internet including on  

Saturday, November 28, 2020

Farmer's Wife Blocks - 104 Wild Geese - 12 Broken Sugar Bowl - 9 Box

Block 104 - Wild Geese
 

Paper-pieced, except for the middle hourglass block.  

B&W Version

I realized a little too late that the green and blue were too close in value (as in, if this photo were black and white, you wouldn't really be able to tell the difference between those parts of the block).  First I made a blue and green hourglass block for the center, but felt it was too dark, so I made a second one with half cream to brighten it up.   The biggest question was which color to accentuate? The green or the blur?  I opted for blue.


Block 12 - Broken Sugar Bowl

 Not paper-pieced.  I'm not crazy about these kinds of half-square blocks, because they look sharp and pointy.  Yes-- like one of those crystal candy dishes. 

Not much to say about this one.  I did decide that if I used the same blue or green in all three blocks for the week, that it would be enough to tie into the overall quilt -- at least that's my theory today. 

Block 9 - Box

 Not paper-pieced.  Pretty straight-forward with half-square triangles.  The tines of the star create a rotary motion in and of themselves.  I used a scrap green for the center to bring even more movement and interest-- or maybe to slow it down, and make it a little more organic -- like ripples on water.


Tutorials from Handmade Karma for Week 11.

See Handmade Karma's full set of Farmer's Wife blocks and tutorials.

Friday, November 27, 2020

In the Dye Pot: Kettle-Dyed Sock Yarn

Since I finished a new pair of socks, I felt like I had depleted my stash of dyed sock yarn.   So -- out with the colors ...  I looked over my already mixed Procion dye stocks in the basement wet studio and chose several old blues (Strong Blue, Turquoise, Sky Blue) and decided to use them up in a no-dye-left-behind stance.


I also mixed up a batch of Black Cherry.  

Using Dharma's instructions for Procion Dye on wool (no soda ash, as it can destroy the protein fibers).   I sized it for roughly 1/2 pound of fiber, or 2 balls of merino wool yarn, each at 100 grams. [Actually, this is what I SHOULD HAVE DONE.  I miscalculated, and thought my 2 balls of yarn required a double batch ofdye.  That's why it came out darker than expected, without the flecks of white for a nice gradient.]

Pre-soak the balls of yarn in room-temp water for about 30 minutes.

In the Dye Pot,
1-1/2 T salt
1/3 cup white vinegar
Enough water to cover / submerge the balls of yarn.
Heat this until it gets just ready to simmer.

For the dye concentrates, I mixed up
1 tsp dye powder with
about 2 cups warm water.
1 put that in a plastic bottle with a tight-fitting cap, so I could shake it up until the dye powder was completely dissolved.

Once the dye pot was hot enough (just ready to simmer, not boil), I added the dye concentrate -- not usually the entire bottle (except for the teal). Stir that up.
Then add the balls of yarn.

Then I let them simmer on the stove for about 1 hour.  I am amazed at how the Procion dye nearly exhausts with this technique -- I see that a lot with the food coloring, but usually not with the Procion on cotton.

Thursday, November 26, 2020

Spoon Butter

Wooden Spoons get a spa day!

Aren't those olive wood utentils gorgeous!

Craft Week continues!  I refurbished the wooden spoons this morning.  

They were looking a little dull, tired and dried out.  We all get that sometimes ...  Time for a spa day!


The recipe is remarkably simple:

  • 2 oz. beeswax
  • 5 oz. mineral oil
  • 3 drops lemon essential oil 

Melt the beeswax (with 1 oz mineral oil) in a jar in a pan of simmering water, approximating a double boiler.   When the wax has melted, add the rest of the mineral oil.  Let that melt and mix.

Now it's easy to condition your wooden spoons!  Just rub it in ...

This also seems to work for the plastic pot handles, that can also get tired and dried out. 


Wednesday, November 25, 2020

Christmas Simmer Pot Gift Jars


Christmas Simmer Pot:

Cranberries, Orange and Lemon Peel, Cinnamon, Cloves, Pine Branches.

Smells like mulled cider!

I am on vacation all week: Craft Week at home.  With the pandemic raging at ridiculous proportions,  and not being able to gather for the Holidays, I decided to spread a little Christmas Cheer by making up these little gift jars so friends can aromatherapy their way to merry & bright.


The basic instructions and the printable labels came from An American Patriette.   I did not add the water -- as I was going to be delivering them to people's doors, and wasn't sure if they might sit out overnight and get frozen.   Fortunately, 3 of 4 people were home, and happy to greet me and chat outside for a bit, or go for a walk.  Felt good to reconnect with old friends. 


I am also mailing 2 jars, so included dry ingredients (lemon rind, orange slices) no cranberries.

Puts me in the mood for Riu Riu Chiu, one of my favorite Christmas Carols.    Enjoy!


Tuesday, November 24, 2020

Weaving Yarns for more Circle Scarves


Ordered some new yarn from WEBS to make a few more of those circle scarves:


I could not bear to tear down the loom if it was all set up and "programmed" to make more of those delicious circle scarves.   I had the system down for keeping track of the 72 treadles changes in the pattern repeat.  Why not make more?  One problem:  Yarn Barn of Kansas didn't have any more of the yarns included in the kit (Jagerspun merino laceweight black and that red cashmere.)  So I went shopping with some birthday money ... and the webs discounts made the savings worthwhile esp. with these more expensive yarns. 

First I thought I could dye my own, but then remembered how hard it is to get a true black on wool.  Better just buy that one.  

Here's what I purchased:  


Valley Yarns 2/14 Alpaca Silk 

Alpaca and silk lace weight black on a 1/2-pound cone, suitable for weaving, and strong enough for warp.   I know what' I'll be doing next weekend!


Lorna's Laces Helen's Lace

Here's another lacewieght that I hope will be strong enough for warp someday.  I can dye this some other color if I so desire.  This is a mix of silk and wool (like I'm spinning at the wheel).  It was half price, and I couldn't pass it up.   Should be strong enough for warp and soft enough for weft.  I'll have to see about the weight.


Cashmere, merino and silk mixes in colors for the weft: red, green, and blue.

 This is a little more fuscia-y than anticipated.  Maybe a dip in a little Red Wine dye bath?


Didn't see the green in this when I ordered it. I was thinking it would be more of a singular blue ... Might not work for this project.

May the warping commence!

Monday, November 23, 2020

More Face Masks because the Pandemic Rages On ...

Covid Face Mask. Version 2.3 
Using some of my most favorite Klimt fabric.
Also got a new smart phone, so I can actually take selfies now.

I've been making more face masks because the Covid pandemic continues ...  Hopefully, these will be the last ones I have to make.    

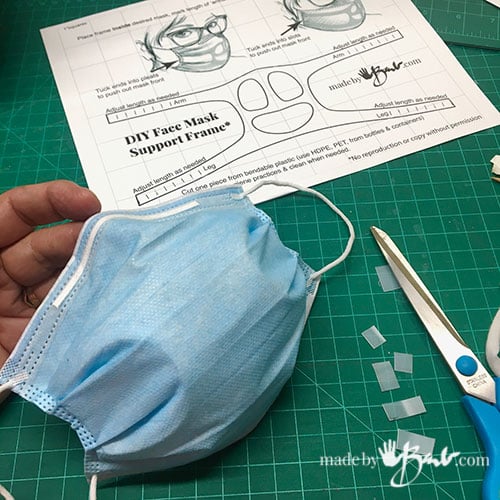
I came across this nifty DIY face mask support frame (made by Barb) back in September.  So simple, and it works so well!   It keeps the mask off your face so that you don't feel claustrophobic.  Even better -- It keeps your glasses from fogging up.  I wish I'd have found it sooner!  You can buy commercial ones, too. But these DIY versions work just as well.  You can use recycled plastic, or I used one of those cheap thin plastic cutting boards.  Very easy to cut and flexible -- and clean.   Here's the pdf version.  


I've also been seeing an extra flap of fabric over the bridge of the nose that helps prevent your glasses from fogging up.  So I've incorporated those innovations into the masks I'm making now. 

I still use the simple no pleat / gathered face mask pattern.   I really hated dealing with pleats, and the ties give your ears a break too.  We cinch it with a pony bead or one of those cord stoppers (What are they called?


Here is is with the mask spreader / sling inside.  It holds it's shape nicely.  Here you can also clearly see that simple little bead that makes it easy to cinch it up quickly and efficiently. 


Here is a shot of the inside, where you can see the filter pocket, along with the simple nose flap.  With the new nose flap, I don't think we need a nose wire.  This seems to be staying in the right place and keeping my glasses from fogging.  

We are using 5-ft boot laces for the cording.  It's soft, but maybe a little thick.


1 for CL, 2 for OKL, and 1 for my Dad. 


More masks: 2-3 for JLC and Bruce; 1 for KS.